
A Backyard Secret for Growing Better Peas
Your backyard is hiding a superior pea support system for zero dollars. Nature provides the best structures for climbing plants. Learn why ‘Pea Brush’—using fallen tree branches—is not only free but actually works better than plastic store-bought options because the tiny tendrils prefer the natural grip of wood over smooth synthetic mesh.
If you have ever watched a young pea plant struggle to gain purchase on a slippery plastic trellis, you know the frustration of seeing those delicate vines flop over in the mud. For decades, I have watched my neighbors spend good money on nylon netting and green plastic coated stakes, only to find themselves out in the garden with rolls of twine trying to tie up plants that refuse to “stick.”
The truth is that our ancestors had this figured out centuries ago. In the grand Victorian kitchen gardens, the head gardeners didn’t reach for a catalog; they headed to the woodlot. They understood something that modern science is only now confirming: plants are incredibly sensitive to the texture and diameter of what they touch.
In this guide, I want to walk you through the art of the pea brush. We are going to look at why this ancient method is still the gold standard for anyone serious about a high-yielding, healthy pea patch. From choosing the right species of wood to the physics of the “grasp,” we will cover everything you need to transform your spring garden into a vertical masterpiece.
The Hidden Science of the Pea Tendril
To understand why a pile of sticks is better than a ten-dollar plastic net, we have to look at how a pea plant “sees” the world. Pea plants are not like ivy; they don’t have sticky pads. Instead, they use modified leaflets called tendrils. These tendrils are biological wonders that perform a slow-motion dance known as circumnutation.
As the plant grows, these tendrils sweep through the air in a circular pattern, searching for something to grab. Research has shown that these tendrils are surprisingly “smart.” When a tendril touches a potential support, it triggers a thigmotropic response—a fancy way of saying it reacts to touch. Within minutes, the cells on the side of the tendril touching the object begin to contract, while cells on the outer side elongate, causing the tendril to coil tightly around the support.
Here is the problem with smooth synthetic materials: they offer no friction. A pea tendril trying to grip a smooth plastic wire is like a rock climber trying to scale a sheet of glass. Natural wood, on the other hand, is covered in microscopic ridges, bark textures, and tiny lateral twigs that provide the perfect “hooks” for those coils. When you use pea brush, you are giving the plant exactly what its genetics are programmed to find in the wild.
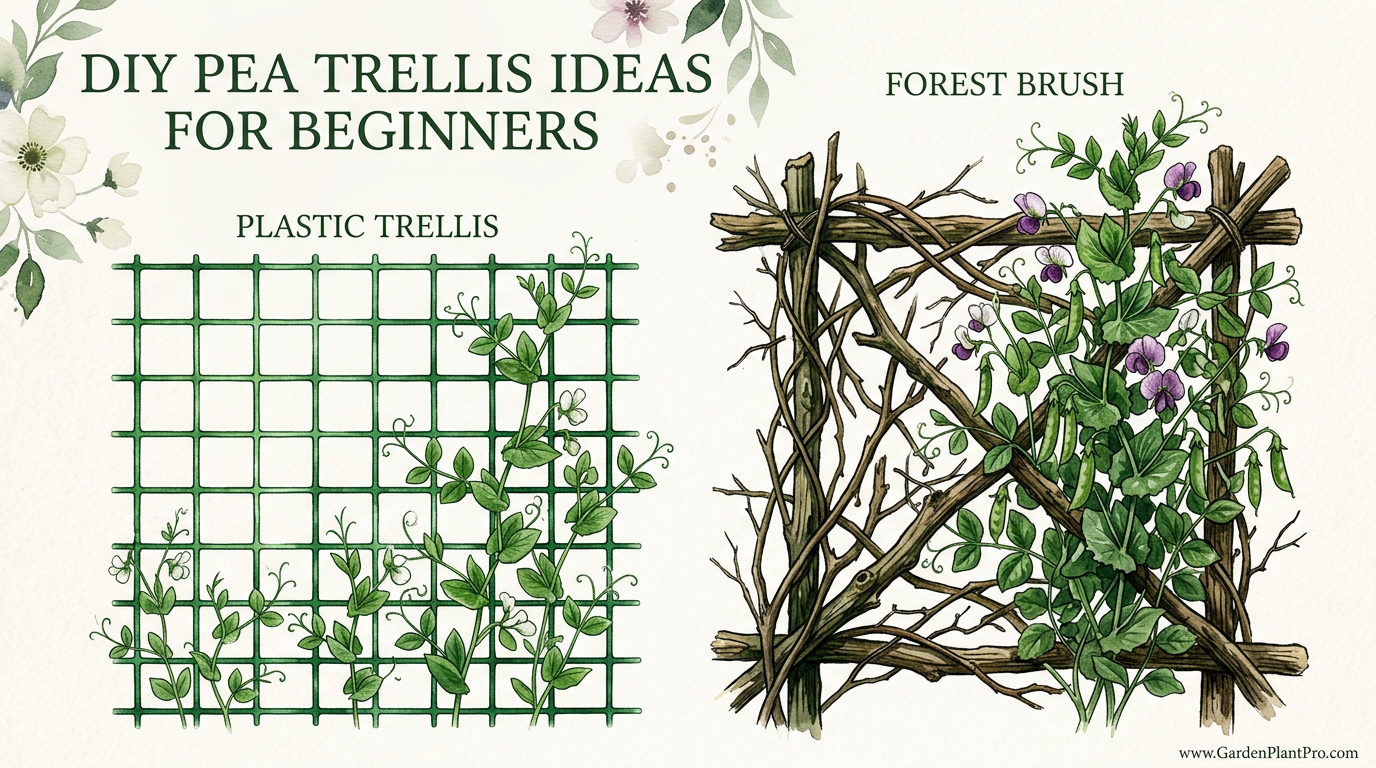
DIY Pea Trellis Ideas For Beginners
The term “Pea Brush” refers to the practice of using twiggy branches—often pruned from fruit trees or harvested from the forest floor—as a natural climbing structure. This is the simplest, most cost-effective way to support your crop. It involves sticking branches directly into the soil along your pea rows, creating a three-dimensional “forest” that the plants can weave through as they grow.
Beginners often think a trellis needs to be a flat, two-dimensional wall. However, pea brush creates a thick, airy volume. Because peas grow in a dense mass, a flat trellis often becomes overcrowded, leading to poor airflow and the dreaded powdery mildew. With brush, the plants can move inward and outward, finding their own space in the light.
This method is used everywhere from small urban raised beds to sprawling country allotments. It is particularly valued in areas where the gardener wants to minimize the use of non-biodegradable plastics. At the end of the season, you don’t have to spend hours untangling dead vines from plastic mesh; you simply pull up the sticks and toss the whole mess into the compost or a brush pile.
The Fan Method
This is the most common way to use pea brush in a traditional garden row. You select branches that are roughly 3 to 5 feet (90 to 150 cm) tall and have a lot of fine, twiggy growth at the ends. You push the thicker “handle” of the branch into the soil every 6 inches (15 cm) along the row. By overlapping the twiggy tops, you create a continuous “hedge” of support that is incredibly sturdy even in spring winds.
The Pea Teepee or Wigwam
If you are growing in a smaller space or a large container, the teepee is your best friend. You take four to six longer branches, sink the bottoms into a circle, and tie the tops together with a bit of natural jute twine. This creates a beautiful focal point in the garden and is particularly effective for “Pole” or “Climbing” varieties that can reach heights of 6 feet (1.8 meters) or more.
How to Build Your Pea Brush Trellis
Building a pea brush support system is more about selection than it is about construction. You don’t need a hammer, a drill, or a level. You just need a pair of sharp loppers and a bit of a discerning eye when you are walking through the woods or pruning your yard.
First, you must time your installation correctly. I always tell my neighbors to get the sticks in the ground before or at the same time you plant your seeds. If you wait until the peas are 6 inches tall, you risk damaging their delicate, shallow root systems when you shove the branches into the earth. Peas are sensitive souls; they don’t like their roots being poked once they’ve started to settle in.
- Step 1: Harvest your material. Look for branches that have a “hand-like” structure—a main stem that branches out into many smaller, thinner fingers. The best diameter for the main stem is about 1 inch (2.5 cm), while the tiny climbing twigs should be less than 1/4 inch (6 mm) thick.
- Step 2: Prep the ground. Ensure your soil is loose and workable. Peas love a well-drained bed. If your soil is heavy clay, you might want to use a garden stake to pre-drill a “pilot hole” for your branches so you don’t have to force them and risk snapping the wood.
- Step 3: Installation. Insert the branches at least 8 to 12 inches (20 to 30 cm) into the soil. You want them to be firm enough that a spring thunderstorm won’t blow them over. If you are using the fan method, angle the branches slightly so the tops interlock with their neighbors.
- Step 4: The “Leader” sticks. If your main brush branches are a bit bare at the bottom, stick a few very small, very twiggy “starter” pieces right next to the emerging seedlings. This gives them something to grab the moment they wake up, preventing them from flopping onto the damp soil where slugs are waiting.
The Best Wood Species for Pea Brush
Not all wood is created equal when it comes to gardening. Some woods rot too fast, some are too smooth, and some might even try to grow back! Choosing the right species will determine if your trellis lasts through the harvest or collapses halfway through June.
Silver Birch (Betula pendula) is often considered the gold standard. It is a “weed wood” in many areas, meaning it grows fast and is often cleared out. It has a wonderful, twiggy habit and a rough bark that pea tendrils adore. However, birch rots quickly when in contact with damp soil, so it is strictly a one-season material.
Hazel (Corylus avellana) is another traditional favorite, especially in Europe. It is incredibly flexible and durable. If you can find hazel, it is excellent for making the “bones” of a teepee. It lasts longer than birch and can sometimes be reused for a second year if stored in a dry spot over the winter.
Fruit Tree Prunings from apple, pear, or cherry trees are fantastic. If you do your orchard pruning in late winter, save those water sprouts and long, thin branches. They are sturdy, have a great texture, and represent the ultimate in garden recycling. Just make sure the wood is “dormant” when you stick it in the ground.
Avoid Willow and Dogwood if you are sticking them into wet spring soil. Both of these species have a miraculous ability to grow roots from a severed branch. I once ended up with a small forest of willow trees in the middle of my pea patch because I wasn’t careful. If you must use them, make sure they have dried out completely for a few months before use, or strip the bark off the bottom 10 inches that goes into the dirt.
DIY PROJECT: Collect rainwater no matter where you live...

This DIY project is the best way to legally collect rainwater NO MATTER where you live. Get chlorine-free water, cut down on your water bills, and have enough for an emergency situation or to water your garden. Read More Here...
Benefits of the Natural Brush Approach
Why would a seasoned gardener choose a pile of sticks over a high-tech garden solution? The benefits go beyond just saving a few dollars at the hardware store. It is about creating a balanced, efficient ecosystem in your backyard.
The primary advantage is Total Grip Coverage. Unlike a string trellis where there is only a line every few inches, pea brush provides a three-dimensional web of opportunities. No matter which way the wind blows or which way the plant leans, there is always a twig within reach of a seeking tendril. This leads to less “lodging” (falling over) and a much cleaner crop.
Another major benefit is Airflow and Disease Prevention. Because brush is airy, it allows the wind to move through the foliage, drying off the leaves after a rain. Peas are notorious for succumbing to fungal issues like powdery mildew once the weather warms up. A dense mass of peas on a flat plastic mesh is a breeding ground for spores; a “cloud” of peas on brush stays much drier and healthier.
Finally, there is the Sustainability Factor. Every year, millions of feet of plastic garden netting end up in landfills because it is too difficult to clean and reuse. Pea brush is carbon-neutral and completely biodegradable. At the end of the season, it returns to the earth, improving your soil structure as it breaks down in the compost pile. It is gardening without a footprint.
Challenges and Common Mistakes
While the pea brush method is simple, there are a few ways it can go wrong for the uninitiated. The most common error is Inadequate Depth. A 5-foot tall branch act like a sail in the wind. If you only push it 3 inches into the soil, the first big spring gust will topple your entire row, crushing your young plants. You must commit to sinking those sticks deep.
Another mistake is Using “Bald” Sticks. If you use branches that have had all their side-twigs trimmed off—like bamboo canes—you are back to the “slippery glass” problem. Peas need those tiny, lateral twigs. If your sticks are too clean, you will have to manually tie the peas to the poles, which defeats the whole purpose of the “free and easy” brush system.
Lastly, don’t forget Variety Matching. If you are growing “Tall Telephone” heirloom peas that can reach 7 feet (2.1 meters), a 3-foot (90 cm) piece of birch brush isn’t going to cut it. Always check your seed packet for the expected height and source your brush accordingly. For the tallest varieties, you might need to combine brush with a few sturdy 8-foot (2.4 meter) poles to provide a central anchor.
Natural Brush vs. Plastic Trellis
If you are still on the fence about which material to use, let’s look at how they stack up in the real world of the backyard garden. While both can technically get the job done, the experience for both the gardener and the plant is quite different.
| Feature | Natural Pea Brush | Plastic/Synthetic Trellis |
|---|---|---|
| Cost | Free (Zero Dollars) | $15 – $50 per season |
| Tendril Grip | Superior (Rough texture) | Poor (Smooth/Slippery) |
| End of Season | Compostable | Landfill or tedious cleaning |
| Airflow | Excellent (3D Volume) | Moderate (2D Surface) |
| Aesthetics | Rustic/Natural | Industrial/Functional |
Practical Tips for a Bountiful Harvest
The trellis is only half the battle. To truly succeed with peas, you have to treat them like the cool-weather royalty they are. They don’t like the heat, and they have a very special relationship with the soil that you can use to your advantage.
Inoculate your seeds. Peas are legumes, which means they can “fix” nitrogen from the air and turn it into fertilizer for themselves. They do this through a partnership with *Rhizobium* bacteria. If you haven’t grown peas in a particular spot for a few years, buying a packet of powdered inoculant—a microbial powder—to coat your seeds before planting can dramatically increase your yield.
Planting depth and spacing. In most regions, you want to sow your seeds 1 inch (2.5 cm) deep and about 2 inches (5 cm) apart. If your spring is particularly wet, consider a slightly shallower planting or a raised bed to prevent the seeds from rotting before they can sprout. I like to plant a double row—two lines of seeds about 6 inches (15 cm) apart—with the pea brush set right down the middle.
Watering and Mulching. Once your peas have found their way onto the brush, they need consistent moisture. However, don’t overwater the base, or you’ll invite root rot. A thick layer of straw or shredded leaf mulch around the base of your pea brush will keep the roots cool and the soil moist. This is crucial because the moment the soil temperature gets too high, the pea plant will stop producing flowers and start to wither.
Advanced Considerations: The Long Game
For those who have been gardening for a few seasons, you know that the garden is a moving puzzle. Peas are a vital piece of that puzzle because of their ability to leave the soil better than they found it. When your harvest is finished and the summer heat finally takes the vines, don’t pull the whole plant out by the roots.
Instead, cut the vines at soil level and leave the roots in the ground. Those little white nodules on the roots are packed with nitrogen. As the roots decay, they release that nitrogen into the soil, providing a free fertilizer boost for the “heavy feeders” that often follow peas in a rotation, like broccoli, kale, or late-season tomatoes. This is the essence of regenerative gardening.
Consider also the Legacy of the Brush. If you find a particularly good source of hazel or hardwood brush, you can sometimes “cure” the sticks by keeping them out of the rain during the winter. While birch is a one-and-done material, a good set of hazel pea sticks can become a beloved part of your garden kit, darkening with age and providing a beautiful, weathered look to your spring beds year after year.
Final Thoughts
Gardening doesn’t always have to be about the latest gadget or the most expensive fertilizer. Sometimes, the most sophisticated solution is the one that has been sitting under our noses for centuries. Using natural pea brush is a lesson in observation—it’s about understanding the biological needs of a plant and meeting them with the resources already provided by the landscape.
When you walk out to your garden this spring and see those first bright green shoots reaching for the sky, you’ll feel a different kind of satisfaction knowing that you’ve built their home from the very trees that shade your yard. It’s a connection to the cycles of the forest and a nod to the generations of gardeners who came before us.

Do you have some charcoal in your house right now? We call charcoal a “miracle leftover” for anyone who wants to be a little more self-sufficient and cut costs. That’s because it can help you with so many different things around the house and garden. You can even use it to make an energy-free fridge. Read More Here...
I encourage you to experiment. Try the fan method in one row and a brush wigwam in another. Observe how the tendrils move, how the wind flows through the leaves, and how much easier it is to spot those sweet, hidden pods when the plants are standing tall. Once you see the results of a zero-dollar support system that actually works better than plastic, you’ll never look at a fallen branch the same way again. Happy growing!