
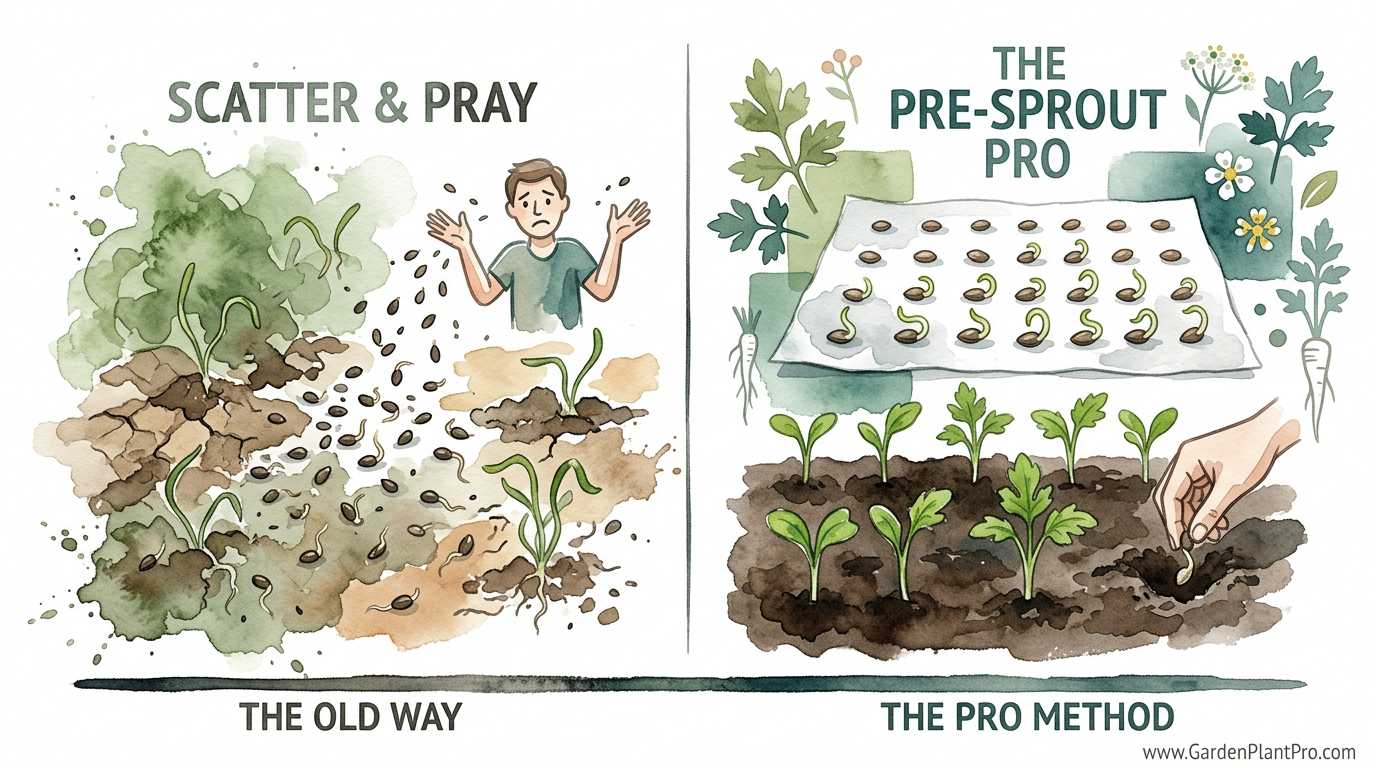
Stop waiting 21 days for seeds that might never even wake up. Parsnip seeds are notoriously fickle and have a short shelf life. If you just ‘scatter and pray,’ you’re asking for gaps in your rows. Precision pre-sprouting ensures every inch of your garden bed is working for you.
I’ve been leaning over this garden fence for a long time, and if there is one thing I’ve learned about parsnips, it’s that they don’t like to be rushed, but they certainly don’t mind a little help. Most folks treat parsnip seeds like carrots, tossing them into the dirt and hoping for the best. But while a carrot might forgive a dry afternoon or a crusty bit of soil, a parsnip seed is much more likely to just give up the ghost.
Pre-sprouting—or “chitting,” as some of the old-timers call it—is simply the process of waking those seeds up in a controlled, warm environment before they ever touch the garden soil. It takes the guesswork out of the equation. You’ll know exactly which seeds are alive and kicking, and you won’t waste weeks staring at an empty patch of mud while the weeds take over.
How To Germinate Parsnip Seeds Faster
The secret to fast parsnip germination isn’t a fancy fertilizer or a secret chemical; it is simply the marriage of consistent moisture and the right temperature. In the wild, parsnip seeds are designed to sit in the cold, damp earth of early spring, slowly absorbing water until they eventually decide to sprout. This process can take anywhere from 14 to 28 days in standard conditions, and sometimes up to 35 days if the soil is particularly cold.
When we talk about germinating them “faster,” we are really talking about bypassng the “dormancy struggle.” By bringing them indoors where the temperature is a steady 15°C to 21°C (60°F to 70°F), we can often see the first signs of life in as little as 5 to 7 days. This method is used by serious growers who want to maximize their growing season and ensure that every single station in their row produces a viable, healthy root.
Think of it like starting a race with your shoes already tied. While the “scatter and pray” method leaves the seed to fight against soil crusting, erratic spring rains, and fluctuating temperatures, pre-sprouting gives the seed a head start in a protected environment. By the time you move them to the garden, they already have a tiny radicle—that’s the first little root—ready to dive deep into your well-prepared soil.
The Science of the Sprout
Parsnip seeds belong to the Apiaceae family, which includes carrots, parsley, and celery. These seeds contain oils that can inhibit water absorption, which is why they take so long to wake up. They also lose viability faster than almost any other common vegetable. If your seeds are more than a year old, your germination rate might drop by 50% or more. Pre-sprouting acts as a built-in viability test; if they don’t sprout on the paper towel, they definitely weren’t going to sprout in the ground.
The Step-by-Step Pre-Sprouting Method
To get started, you don’t need much more than what you already have in your kitchen. This is the beauty of the “The Pre-Sprout Pro” approach—it is high-precision gardening with low-tech tools.
The Paper Towel Technique
This is the most popular method because it allows you to see exactly what is happening. Grab a high-quality paper towel; the cheap ones tend to fall apart when wet. Moisten the towel so it is damp but not dripping. If you can squeeze water out of it like a sponge, it’s too wet. Aim for the dampness of a wrung-out washcloth.
Lay your seeds out on one half of the towel. Keep them spaced about 1 cm (roughly half an inch) apart so their roots don’t get tangled. Fold the other half of the towel over the top. Slide the whole thing into a plastic zip-top bag or a small Tupperware container. This traps the humidity, creating a miniature greenhouse.
Finding the “Sweet Spot” for Heat
Place your container somewhere warm but out of direct sunlight. The top of a refrigerator or a high shelf in the kitchen is usually perfect. You are looking for a temperature around 18°C to 20°C (65°F to 68°F). Avoid placing them directly on a radiator, as too much heat (above 25°C or 77°F) can actually cook the seeds and prevent them from germinating entirely.
The Daily Check-In
Check your seeds every single day. This is critical. Parsnips develop a taproot very quickly once they wake up. You want to catch them the moment you see a tiny white “tail” emerging from the seed. If that root grows too long and starts to weave into the fibers of the paper towel, you’ll likely break it when you try to move it, and a parsnip with a broken taproot will grow into a stunted, forked mess.
Benefits of Pre-Sprouting Parsnips
The most immediate advantage is guaranteed spacing. When you direct sow, you often end up with “bald spots” in the row where seeds failed. Then you have to go back and re-sow, which leads to an uneven harvest. With pre-sprouting, you only plant what has already proven it’s alive. This means your rows will be perfectly full from day one.
Another major benefit is weed management. Parsnips are notoriously slow to emerge, often taking three weeks. In that time, fast-growing weeds like chickweed or fat-hen can completely overgrow the area. By the time the parsnips poke their heads up, you can’t tell the crop from the weeds. Pre-sprouting shortens the “invisible” stage, allowing your parsnips to get established before the weeds take over the bed.
Finally, there is the viability factor. Since parsnip seeds are only good for about 12 months, using last year’s packet is a gamble. Pre-sprouting tells you within a week if your seeds are duds. If nothing happens, you still have time to run to the store and buy a fresh packet before the planting window closes.
Common Mistakes and How to Avoid Them
The most common error I see is waiting too long to transplant. Some folks get excited seeing those little green leaves starting to show inside the plastic bag. By that point, it is often too late. The taproot is the most sensitive part of the parsnip. Once it reaches more than 5 mm (about a quarter inch) in length, it becomes incredibly fragile. You want to move them to the soil the second that white tip appears.
Another pitfall is excessive moisture. While the seeds need water to wake up, they also need oxygen. If the paper towel is swimming in water, the seeds will rot before they sprout. If you see the paper towel turning a yellowish or brownish color, or if it smells “off,” you’ve got a bacteria problem. Start over with fresh towels and a lighter touch with the water.
Lastly, don’t forget about soil preparation. All the pre-sprouting in the world won’t save a parsnip planted in stony, compacted clay. While your seeds are in their “warm bath” indoors, take the time to prep your garden bed. Dig deep—at least 30 cm (12 inches)—and remove any stones or hard clumps. If your soil is heavy, mix in some sharp sand or well-rotted leaf mold to lighten the texture.
When Pre-Sprouting Might Not Be Ideal
While I’m a big fan of this method, it isn’t for everyone. If you are planting hundreds of feet of parsnips for a commercial crop, the manual labor of handling individual sprouted seeds with tweezers is simply too much. In those cases, direct sowing with a precision seeder and using “fluid sowing” (mixing seeds in a gel) is a better approach.
DIY PROJECT: Collect rainwater no matter where you live...

This DIY project is the best way to legally collect rainwater NO MATTER where you live. Get chlorine-free water, cut down on your water bills, and have enough for an emergency situation or to water your garden. Read More Here...
It’s also a bit tricky if you have a “heavy hand.” If you aren’t comfortable handling tiny, delicate things, you might do more damage than good. The transition from a cozy indoor bag to the outdoor soil is a shock. If your garden is currently experiencing a heatwave or a sudden late-season deep freeze, the tender sprouts might not survive the move as well as a seed that germinated naturally in the cold ground.
Practical Tips for Successful Transplanting
When it comes time to move your sprouted seeds to the garden, you need to be gentle. I like to use a damp matchstick or a pair of blunt-nosed tweezers. Moisten the tip of the matchstick, touch it to the seed, and it will usually stick just enough for you to lift it.
- The “Dibber” Hole: Use a pencil or a small stick to make a hole about 1 cm (0.5 inch) deep in your prepared bed.
- The Placement: Drop the seed in with the white root pointing down. Don’t worry if it isn’t perfectly vertical; the plant knows which way is down, but giving it a head start helps.
- The Cover-Up: Lightly crumble fine soil or sifted compost over the top. Do not pack it down hard. You want the sprout to be able to push through easily.
- Watering In: Use a watering can with a very fine “rose” (the nozzle with tiny holes). A heavy stream of water will wash the seeds away or bury them too deep.
The “Radish Trick”
Because even pre-sprouted parsnips take a few days to show their green tops, I always sow a few radish seeds in the same row. Radishes sprout in 3 or 4 days. They act as “row markers,” showing you exactly where the parsnips are so you don’t accidentally hoe them up while weeding. By the time the parsnips need the space, you’ve already harvested and eaten the radishes!
Advanced Considerations: The Cardboard Tube Method
If you want the ultimate parsnip, some gardeners use a hybrid method involving cardboard toilet paper or paper towel rolls. They fill the tubes with fine compost and plant the pre-sprouted seed at the top. This allows the parsnip to grow its long taproot straight down through the loose compost without any resistance. When the plant is about 5 cm (2 inches) tall, the entire tube is buried in the garden. The cardboard eventually rots away, and the parsnip never knows its roots were “disturbed.” This is a fantastic way to grow “show-quality” parsnips that are perfectly straight and up to 45 cm (18 inches) long.
Example Scenario: A Spring Sowing
Imagine it is mid-April. The soil is still a bit chilly—maybe 8°C (46°F). If you sowed directly now, you might wait 4 weeks for sprouts. Instead, you start 50 seeds in a damp paper towel on your kitchen counter on Monday. By Saturday, 42 of them have tiny white tails. You spend Sunday morning in the garden, placing those 42 “sure bets” into your perfectly prepped, stone-free bed. By the following weekend, you have 42 green seedlings looking back at you, while your neighbor—who sowed directly on the same Monday—is still looking at a bare patch of dirt and wondering if his seeds were duds.
In this scenario, you’ve saved yourself 3 weeks of weeding and 3 weeks of “wondering.” Plus, you know you have exactly 42 plants, spaced perfectly for maximum growth.
Final Thoughts
Mastering the parsnip is a badge of honor for any backyard gardener. They are a test of patience, preparation, and technique. By choosing to pre-sprout, you are stepping away from the “scatter and pray” mentality and taking control of your garden’s productivity. It turns a frustratingly slow process into an engaging, visible success story.
Don’t be afraid to experiment. Try a few rows direct-sown and a few rows pre-sprouted. You’ll soon see why so many of us who have been doing this for decades prefer the precision of the pre-sprout. It’s about making sure every bit of effort you put into digging that soil is rewarded with a sweet, nutty, ivory-white root come winter.
Once you get those parsnips settled, you might find yourself looking at your carrots and beets with the same “pre-sprouting” eye. While not every vegetable requires this level of care, for the ones that do, the difference in your harvest will speak for itself. Happy gardening, neighbor!