
Once you taste the complex oils of a homegrown hardneck bulb, you’ll realize the supermarket has been selling you cardboard for years. That bleached white garlic in the grocery store is bred for shelf-life and shipping, not flavor. When you move to Pro-level gardening, you plant hardneck heirloom varieties that produce delicious scapes and cloves with 10x the medicinal potency. Here is why you need to upgrade your bulbs.
Most folks start their garlic journey with whatever they find in the produce aisle. It is a natural starting point, but it usually leads to disappointment. Those commercial bulbs are almost always softneck varieties grown in massive fields, often overseas, and treated with sprout inhibitors to keep them “fresh” on the shelf. They lack the depth, the heat, and the soul of the garlic our grandparents used to grow.
Growing hardneck garlic is a different experience entirely. It requires a bit more patience and a better understanding of the seasons, but the reward is a culinary and medicinal powerhouse. You get two harvests from one plant—the curly green scapes in early summer and the fat, easy-to-peel bulbs in late summer. For anyone serious about self-sufficiency or gourmet cooking, this is the gold standard.
There is something deeply satisfying about tucking cloves into the cold earth in late autumn while the rest of the garden is going to sleep. It is a promise of life during the winter months. By the time the first green shoots poke through the snow or mulch in early spring, you know your soil is working for you. Let’s walk through how to master this crop from the ground up.
Growing Hardneck Garlic Vs Softneck
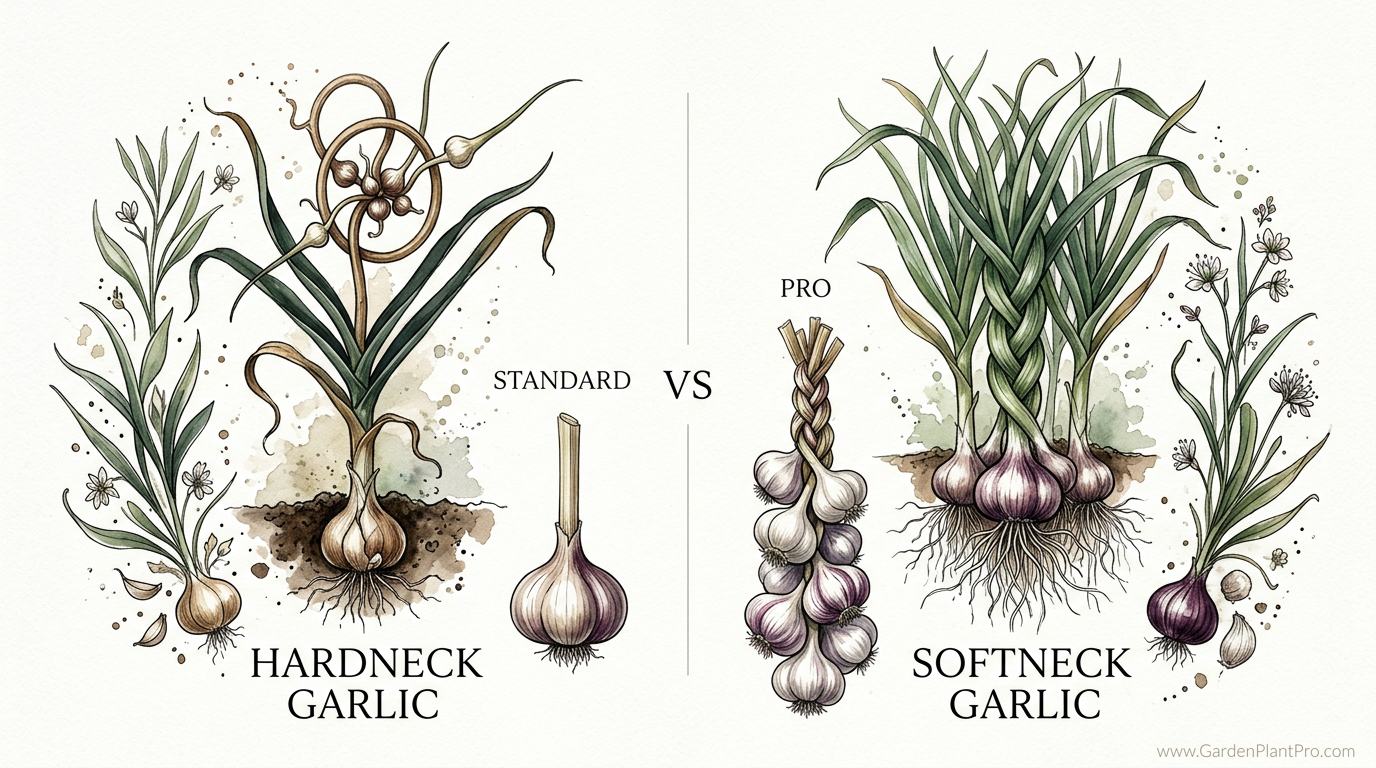
If you want to understand the difference between these two types, just look at the center of the bulb. Hardneck garlic (Allium sativum var. ophioscorodon) is much closer to wild garlic. It produces a stiff, woody central stalk that eventually grows a flowering head called a scape. Softneck garlic (Allium sativum var. sativum), the kind you see in white braids at the store, has flexible leaves that don’t produce a hard stalk.
Climate is the biggest factor here. Hardneck varieties are much more cold-hardy. They actually require a period of cold temperatures, known as vernalization, to trigger the plant into dividing into separate cloves. Without at least 6 to 10 weeks of temperatures below 40°F (4.5°C), a hardneck clove might just grow into one large, onion-like bulb called a “round.” This makes hardnecks the undisputed kings of northern gardens.
Flavor is where the hardneck truly pulls ahead. While softnecks are mild and consistent, hardnecks offer a spectrum of taste. Some are spicy and aggressive, while others are sweet and nutty when roasted. They generally have fewer cloves per bulb—usually 4 to 12—but those cloves are significantly larger and encased in beautiful, often purple-streaked skins that peel away with very little effort.
The trade-off for this superior flavor is storage life. Softneck garlic can last 9 to 12 months because its tight, multi-layered wrappers keep moisture in. Hardneck garlic, with its thicker skins but fewer layers, typically lasts 4 to 6 months. However, for a serious gardener, the flavor and the bonus harvest of scapes make this a trade-worth making every single time.
Choosing the Right Heirloom Varieties
Selecting your seed garlic is the most important decision you will make. You cannot just use the garlic from your pantry if it came from a store. Many commercial bulbs are treated to prevent sprouting, and they may carry soil-borne diseases that could ruin your garden beds for years. Always buy “seed garlic” from a reputable grower.
The Porcelain Group
Porcelains are the heavy hitters of the hardneck world. Varieties like Music and German Extra Hardy are famous for their massive cloves and high allicin content. Allicin is the compound responsible for garlic’s medicinal properties, and Porcelains often test significantly higher than other types. They usually have 4 to 6 very large cloves per bulb and can store slightly longer than other hardnecks, sometimes up to 7 months in ideal conditions.
The Rocambole Group
If you ask a chef for their favorite garlic, they will likely say Spanish Roja or another Rocambole. These are widely considered the best-tasting garlics in existence. They have a complex, full-bodied flavor that isn’t just “hot”—it’s rich. The skins are loose and easy to peel, but this also means they have a very short shelf life, often only 3 to 4 months. They are the true gourmet’s choice.
The Purple Stripe Group
These are the beauties of the garden. Varieties like Chesnok Red and Persian Star feature vivid purple streaks on their wrappers. They are exceptionally good for roasting because they retain their shape and develop a creamy, sweet texture. They usually have 8 to 12 cloves per bulb, which are slightly smaller than Porcelains but packed with a spicy, clean heat when eaten raw.
Soil Preparation and Garden Conditions
Garlic is a heavy feeder, but it hates “wet feet.” The ideal soil is a sandy loam that is rich in organic matter. If you have heavy clay soil, your bulbs may struggle to expand, or worse, they may rot during a wet winter. Using raised beds is a great way to ensure the drainage necessary for healthy bulb development.
Preparation should begin weeks before you intend to plant. Incorporate 2 to 3 inches (5-7 cm) of well-rotted compost or aged manure into the top 6 inches (15 cm) of your soil. Garlic thrives in a pH range of 6.0 to 7.0. If your soil is too acidic, a bit of garden lime can help bring it into balance. Avoid using fresh manure, as it can harbor pathogens and may actually burn the delicate roots of the emerging cloves.
Phosphorus and potassium are vital for root and bulb growth. While nitrogen is important, too much of it at the wrong time can lead to excessive leaf growth at the expense of the bulb. A balanced organic fertilizer, like a 5-10-10 or 10-10-10 mix, worked into the bed at planting time provides the slow-release nutrients the cloves need to establish themselves before the ground freezes.
Full sun is non-negotiable. Garlic needs at least 6 to 8 hours of direct sunlight daily during its active growing season in the spring and summer. Do not plant it in the shadow of trees or tall summer crops. Since garlic stays in the ground for 8 to 9 months, choose a location where it won’t interfere with your spring planting plans for other vegetables.
The Planting Ritual: Timing and Depth
Timing is everything when it comes to fall planting. You want to get your cloves in the ground about 4 to 6 weeks before the first hard freeze. This allows the clove to develop a strong root system without sending up green shoots that could be damaged by the winter cold. In most northern regions, this window falls between late September and early November.
When you are ready to plant, “crack” the bulbs into individual cloves. Leave the papery skin on each clove; it acts as a protective barrier against soil-borne fungi. Select only the largest, healthiest cloves for planting. The size of the clove you plant is directly related to the size of the bulb you will harvest. Use the smaller cloves for your dinner that night.
Plant the cloves with the flat (root) end down and the pointy end up. In colder climates, a depth of 3 to 4 inches (7.5-10 cm) is recommended to protect the clove from the “heaving” of the soil during freeze-thaw cycles. In milder climates, 2 inches (5 cm) is usually sufficient. Space the cloves 6 inches (15 cm) apart within the row, and keep the rows about 12 inches (30 cm) apart to allow for easy weeding and airflow.
DIY PROJECT: Collect rainwater no matter where you live...

This DIY project is the best way to legally collect rainwater NO MATTER where you live. Get chlorine-free water, cut down on your water bills, and have enough for an emergency situation or to water your garden. Read More Here...
| Factor | Hardneck Garlic (PRO) | Softneck Garlic (STANDARD) |
|---|---|---|
| Climate | Cold hardy; needs winter chill. | Better for mild/warmer winters. |
| Flavor Profile | Complex, spicy, and robust. | Mild, versatile, and subtle. |
| Cloves per Bulb | 4–12 large cloves. | 12–20+ smaller cloves. |
| Storage Life | 4–6 months. | 9–12 months. |
| Edible Scapes | Yes (Gourmet delicacy). | Rarely. |
Winter Care and Mulching
Mulch is your garlic’s best friend during the winter. Once the cloves are tucked in, cover the entire bed with 4 to 6 inches (10-15 cm) of weed-free straw, shredded leaves, or clean hay. This layer of insulation keeps the soil temperature stable, preventing the ground from rapidly freezing and thawing, which can literally push the cloves out of the earth.
Winter moisture is rarely an issue for garlic unless your soil has poor drainage. The mulch helps keep the moisture level consistent. If you live in an area with very little snow and extremely dry winters, you might need to water the bed once or twice, but generally, the garlic will remain dormant and safe under its blanket until the spring sun warms the soil.
As the temperatures begin to rise in early spring, keep a close eye on the bed. You will see the first green tips pushing through the mulch. If the mulch is very thick or has matted down into a crust, you can gently pull it back a bit to help the shoots emerge. However, leaving a couple of inches of mulch in place is excellent for suppressing early-season weeds and conserving soil moisture.
Spring Feeding and Scape Management
When the garlic is about 6 inches (15 cm) tall, it is time for a nitrogen boost. This is the period of rapid vegetative growth. Garlic plants produce one leaf for every clove that will eventually form in the bulb. More leaves mean more energy for the bulb. Use a high-nitrogen organic fertilizer like blood meal or a liquid fish emulsion every 3 to 4 weeks until the first of June.
Watering becomes critical as the weather warms up. Garlic needs about 1 inch (2.5 cm) of water per week. If you aren’t getting rain, you must irrigate. Drip irrigation is the most efficient method because it delivers water directly to the roots without wetting the leaves, which can lead to fungal diseases like rust or downy mildew.
The defining moment for hardneck growers is the emergence of the scape. In late spring or early summer, the plant will send up a central stalk that curls in a loop. This is the flower head. To maximize bulb size, you must cut these scapes off once they have completed one full loop. If you leave them on, the plant will divert up to 25% of its energy away from the bulb and into producing “bulbils” at the top of the stalk.
Don’t throw those scapes away! They are a prized delicacy with a mild, sweet garlic flavor. You can grill them, chop them into stir-fries, or blend them into a world-class pesto. Removing the scape is a pro-level move that ensures your underground bulbs reach their maximum potential size.
The Harvest: Timing and Techniques
Knowing when to harvest is the trickiest part of growing garlic. Dig too early, and the cloves will be small and lack a protective wrapper. Wait too long, and the bulbs will “shatter,” meaning the outer wrappers will split open, leaving the cloves exposed to rot and reducing their storage life significantly.
The signal for harvest is in the leaves. Unlike onions, which tell you they are ready by falling over, garlic stays upright. You want to harvest when the bottom 2 or 3 leaves have turned brown and withered, but the top 4 or 5 leaves are still green. Each green leaf represents one intact layer of papery skin around the bulb. If you have 5 green leaves at harvest, you will have 5 layers of protection for storage.
Stop watering the garlic about 2 weeks before you plan to harvest. Dry soil makes the process much cleaner and reduces the risk of mold. Never pull the garlic out by the stem; you can bruise the neck or even pull the stalk right out of the bulb. Instead, use a garden fork to gently loosen the soil well away from the bulbs, then lift them carefully from beneath.
Once the bulbs are out of the ground, handle them like eggs. Any bruise or nick can become an entry point for disease. Gently knock off the large clumps of soil, but do not wash the bulbs with water. Moisture is the enemy of a successful cure. Move the harvested plants immediately to a shaded, well-ventilated area away from direct sunlight, which can “cook” the bulbs and ruin the flavor.
Curing and Storage
Curing is the process of slowly drying the outer skins and the neck of the garlic so it can be stored. This usually takes 4 to 8 weeks depending on the humidity in your area. The best setup is to hang the garlic in bundles of 5 to 10 plants or spread them out in a single layer on a wire rack in a barn, garage, or covered porch. Good airflow is the most important factor.
You will know the garlic is cured when the outer wrappers are dry and crispy, and the roots are brittle. The neck of the plant should feel hard and contain no moisture when you squeeze it. At this point, you can trim the roots to about 1/4 inch (6 mm) and cut the stalks to 1 or 2 inches (2.5-5 cm) above the bulb. Clean off the outermost layer of dirty skin with your thumb, but be careful not to expose the cloves.
Store your cured garlic in a cool, dark place with moderate humidity. The ideal temperature is between 35°F and 50°F (1.5°C to 10°C). Never store garlic in the refrigerator for long periods; the cold, humid environment will actually trigger it to sprout. A cool basement or a dark pantry usually works well. Use mesh bags or open crates to ensure the bulbs can breathe.
Challenges and Common Mistakes
One of the most frequent errors is planting grocery store garlic. Many beginners do this to save money, but it often introduces the Alluim Leaf Miner or Bloat Nematodes into their soil. These pests can persist in the ground for years, making it impossible to grow any members of the onion family. Start with certified disease-free seed to protect your investment.
Poor drainage is another silent killer. If you notice your garlic leaves turning yellow prematurely or the bulbs feeling spongy at harvest, you likely have Fusarium Basal Rot. This fungus thrives in waterlogged soil. If this happens, you must rotate your crops and avoid planting garlic or onions in that spot for at least 3 to 4 years.
Weed competition can significantly reduce your yields. Garlic has a very shallow root system and does not compete well with aggressive garden weeds. Maintaining a thick mulch layer is the best defense. If weeds do poke through, pull them by hand while they are small to avoid disturbing the garlic’s roots. A clean bed in the spring often results in 50% larger bulbs.

Do you have some charcoal in your house right now? We call charcoal a “miracle leftover” for anyone who wants to be a little more self-sufficient and cut costs. That’s because it can help you with so many different things around the house and garden. You can even use it to make an energy-free fridge. Read More Here...
Advanced Considerations for Pro Gardeners
For those looking to take their garlic game to the next level, consider foliar feeding. Applying a diluted kelp or fish emulsion spray directly to the leaves every two weeks in the spring can significantly boost the plant’s ability to photosynthesize and build large bulbs. The plant absorbs these nutrients through the stomata in the leaves much faster than through the roots.
Seed selection should be an ongoing process. Every year, set aside your absolute best, largest, and most beautiful bulbs to be your seed for next year. By doing this, you are effectively breeding a “landrace” variety that is perfectly adapted to your specific soil and microclimate. Over 5 to 10 years, your garlic will become more resilient and productive than the original seed you bought.
If you live in a warmer climate (Zone 8 or 9) but still want to grow hardnecks, you can use artificial vernalization. Put your seed bulbs in a paper bag in the crisper drawer of your refrigerator for 8 to 10 weeks before planting. This “tricks” the garlic into thinking it has gone through a northern winter. Plant them during the coolest part of your year, and you may be surprised at the results.
Final Thoughts
Growing hardneck garlic is a rite of passage for the serious gardener. It connects you to the seasons in a way few other crops can. From the quiet act of autumn planting to the spicy reward of the summer harvest, it is a cycle that pays dividends in both flavor and health. Once you harvest your first batch of Music or Chesnok Red, you will never look at a grocery store bulb the same way again.
Don’t be afraid to experiment with different varieties. Every garden is different, and finding the specific hardneck that loves your soil is part of the joy. Whether you are roasting cloves for a family dinner or using the high allicin content of Porcelains for a winter wellness tonic, the effort you put into the soil will come back to you tenfold.
Start small if you need to, but start this fall. Prepare your beds, find a reputable seed source, and get those cloves in the ground. By next summer, you’ll be sharing scapes over the fence and enjoying the best garlic you’ve ever tasted. Happy gardening!