
Your kitchen scraps are actually more powerful than the world’s most expensive synthetic fertilizers. Big Ag wants you to believe that peppers need complex chemical cocktails to thrive. The truth? Some fermented weeds and kitchen scraps create a microbial explosion that produces way more heat and flavor for zero dollars.
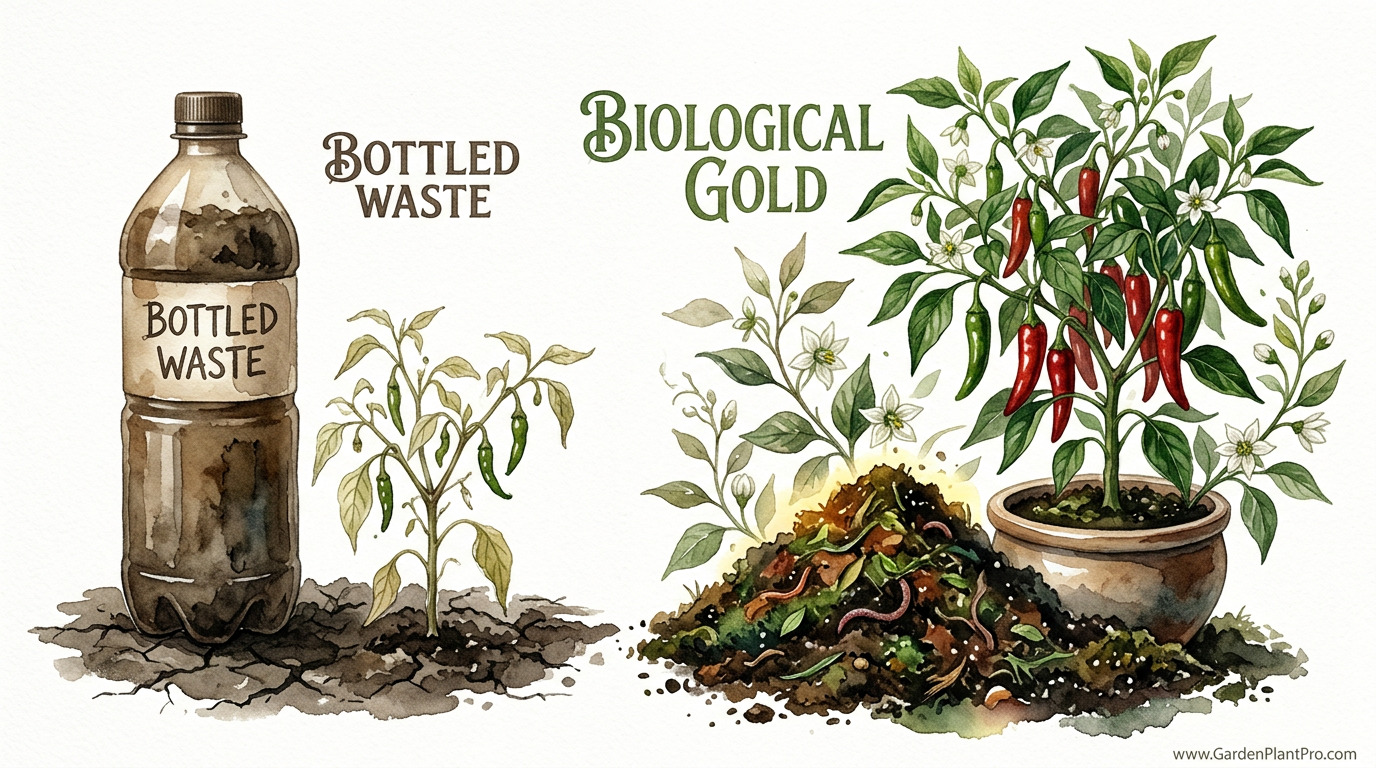
I have spent the better part of forty years watching the seasons turn from my back porch, and if there is one thing the soil has taught me, it is that nature does not need a laboratory to grow a world-class habanero. When you walk into a big-box store, they point you toward those bright blue crystals and plastic bottles, promising you a garden miracle. But those are just “bottled waste” compared to the “biological gold” you can brew right in a five-gallon (19-liter) bucket behind your shed.
Growing chillis is a bit like raising a stubborn teenager. They have specific needs at different times, they can get real moody if the weather changes, and if you feed them the wrong thing, they will just sit there and pouts. But once you understand the rhythm of organic feeding, you will see your plants transform. We are talking about stems like rebar and peppers so vibrant they look like they are glowing.
In this guide, I am going to walk you through everything I have learned about the best organic fertilizer for chillis. We will go beyond the basics of N-P-K and look at the living world beneath the surface of your garden beds. Whether you are growing a mild bell pepper or a tongue-melting Carolina Reaper, the principles of organic feeding remain the same: feed the soil, and the soil will feed the plant.
Best Organic Fertilizer For Chillis
When we talk about the best organic fertilizer for chillis, we are really talking about a system of “living” nutrition. Unlike synthetic fertilizers that act like a direct injection of sugar for the plant, organic fertilizers work by feeding the billions of microorganisms—the bacteria, fungi, and protozoa—that live in your soil. These tiny workers break down organic matter and hand-deliver nutrients to your pepper roots exactly when they need them.
Chilli peppers are heavy feeders. They require a steady supply of nitrogen for their early leafy growth, but they also crave phosphorus and potassium once they start pushing out those flowers and fruits. In the organic world, we do not just dump one product on the ground and walk away. We use a combination of slow-release solids, like compost and bone meal, and fast-acting liquid “teas” that provide an immediate boost during the peak of summer.
The real “best” fertilizer is not a single bag you buy; it is a cycle of nutrients. It starts with a base of high-quality compost or aged manure to build soil structure. Then, we layer in specific amendments like kelp for micronutrients, eggshells for calcium to prevent blossom end rot, and fermented plant juices to stimulate the plant’s immune system. This approach mimics the forest floor, where nothing is wasted and everything is recycled.
How Your Chilli Plants Eat: The N-P-K and Beyond
Before we get into the recipes, you need to understand what your peppers are actually looking for. If you look at a bag of fertilizer, you will see three numbers, like 5-10-10 or 10-10-10. These represent Nitrogen (N), Phosphorus (P), and Potassium (K).
Nitrogen (N) is for the green stuff. It builds the “solar panels” of your plant—the leaves. If your pepper plant is yellowing or looks stunted in May, it is likely hungry for nitrogen. But be careful; too much nitrogen in July will give you a beautiful, lush bush with zero peppers on it.
Phosphorus (P) is the engine for roots and flowers. It helps the plant establish a deep, strong foundation and encourages the production of those white blossoms that eventually turn into fruit.
Potassium (K) is the “health” nutrient. It regulates water movement inside the plant and is responsible for the final quality of your harvest. It helps the peppers develop their thick walls, bright colors, and that signature heat.
Beyond the big three, chillis are desperate for Calcium and Magnesium. Calcium is the “glue” that holds cell walls together. Without it, the bottom of your peppers will turn black and mushy—a heartbreak known as blossom end rot. Magnesium is the heart of the chlorophyll molecule; without it, your leaves cannot turn sunlight into energy.
DIY Biological Gold: Homemade Liquid Fertilizers
The most effective way to see immediate results in your chilli patch is through liquid feeding. These “teas” and ferments are teeming with life and nutrients that are immediately bioavailable. Here are the three main types I use in my own garden.
1. The Classic Weed Tea (High Nitrogen)
Don’t curse those weeds you pull; use them. Deep-rooted weeds like dandelions, stinging nettles, and comfrey are “dynamic accumulators.” They reach deep into the subsoil to pull up minerals that your peppers can’t reach.
The Process:
Fill a 5-gallon (19-liter) bucket halfway with chopped-up weeds. Fill the rest with non-chlorinated water (rainwater is best). Cover it loosely and let it sit for two to four weeks. Warning: it will smell like a swamp, but that is the smell of nitrogen being released. Dilute the dark liquid 1:10 with water until it looks like weak tea, then pour it at the base of your plants every two weeks during the early growth phase.
2. Fermented Plant Juice (KNF Method)
This is a trick I learned from Korean Natural Farming (KNF). It uses brown sugar to extract the “essence” or “juice” of a plant through osmosis. It is much more stable than weed tea and does not smell nearly as bad.
The Process:
Collect fast-growing tips of plants like comfrey or even small suckers from your tomato plants in the early morning while they are still full of growth hormones. Weigh the plant material and mix it with an equal weight of brown sugar. Pack it into a glass jar and let it ferment for 5 to 7 days. Strain out the liquid. This “syrup” is packed with enzymes. Use a tiny amount—about one tablespoon per gallon (4 liters) of water—as a foliar spray or soil drench.
3. The Kitchen Scrap Special (The Fruiting Phase)
When your peppers start to flower, they need a shift in diet. They want less nitrogen and more potassium and calcium.
The Process:
Save your banana peels and eggshells. Dry the eggshells in the oven until they are brittle, then grind them into a fine powder. Soak banana peels in a jar of water for 48 hours to create a “potassium tea.” For a real boost, mix one tablespoon of Epsom salts (magnesium sulfate) into a gallon (4 liters) of water. This combo provides the magnesium, potassium, and calcium needed for high-quality fruit.
DIY PROJECT: Collect rainwater no matter where you live...

This DIY project is the best way to legally collect rainwater NO MATTER where you live. Get chlorine-free water, cut down on your water bills, and have enough for an emergency situation or to water your garden. Read More Here...
Benefits of the Organic Approach
Choosing organic fertilizers over synthetic ones is not just about being “eco-friendly.” It is about the physical and chemical reality of your soil. Synthetic fertilizers are salts. Over time, they can build up in the soil, killing off beneficial fungi and making the ground hard and crusty.
Organic feeding improves soil structure. As organic matter breaks down, it creates “pockets” in the soil that hold onto water and air. This means you have to water less often, and your roots can breathe.
Another major benefit is flavor and heat. There is a reason why home-grown peppers taste better than the ones in the plastic bags at the supermarket. Organic fertilizers provide a full spectrum of trace minerals—boron, manganese, zinc, and iron—that synthetic N-P-K mixes often skip. These minerals are the building blocks of the complex oils (capsaicinoids) that give peppers their flavor and fire.
Finally, there is the cost. If you are composting your kitchen scraps and brewing weed teas, your fertilizer budget drops to nearly zero. You are taking waste that would go to a landfill and turning it into the most productive garden you have ever had.
Common Mistakes to Avoid
Even with organic methods, you can have too much of a good thing. Here are the most common pitfalls I see folks fall into when they are first starting out.
Using “Hot” Manure: Never put fresh chicken or cow manure directly on your pepper plants. It is too high in ammonia and will literally burn the roots of your plants. Always age your manure for at least six months or compost it thoroughly before it touches your garden beds.
Ignoring the pH: Peppers like a slightly acidic soil, generally between 6.0 and 7.0. If your soil is too alkaline (above 7.5), the nutrients in your organic fertilizer—especially iron and phosphorus—will get “locked up.” The nutrients are there, but the plant cannot grab them. Adding some elemental sulfur or pine needle mulch can help bring the pH back down.
Poor Drainage: You can have the best fertilizer in the world, but if your peppers are sitting in “wet feet,” their roots will rot. Peppers hate standing water. Ensure your soil has plenty of organic matter (like leaf mold) to allow for drainage, or grow them in raised beds or containers if you have heavy clay soil.
Limitations: When Organics Face Challenges
I will be the first to tell you that organic gardening requires more patience than the “fast food” synthetic approach. Organic fertilizers are often “slow-release,” meaning the nutrients are not always available the second you put them in the ground.
Heavy Rains: If you live in a region with frequent, heavy downpours, liquid organic fertilizers can leach out of the soil quickly. In these cases, you might need to supplement with more frequent, lighter applications of compost tea to keep the nutrient levels steady.
Cold Soil: Microbes are the “middlemen” in organic feeding, and they do not like the cold. If you transplant your peppers too early in the spring when the soil is still chilly, the microbes won’t be active enough to feed your plants. This is why many organic gardeners see a “stall” in growth during a cold snap.
Comparison: Commercial Organic vs. Home-Brewed
If you don’t have the time to ferment weeds, there are plenty of good commercial organic options. However, they each have their trade-offs compared to the DIY methods.
| Fertilizer Type | Main Advantage | Cost Factor | Microbial Activity |
|---|---|---|---|
| Compost Tea (DIY) | Highest microbial diversity; free to make. | $0 | Excellent |
| Fish Emulsion (Commercial) | Very high in immediate nitrogen. | Medium | Good |
| Kelp Meal (Commercial) | Packed with 60+ trace minerals. | High | Moderate |
| JADAM Liquid (DIY) | Extremely powerful; uses local microbes. | $0 | Superior |
Practical Tips for Success
If you want to get the most out of your organic chilli patch, follow these simple “best practices” I have picked up over the years.
- Mulch like your life depends on it. A thick layer of straw, shredded leaves, or wood chips protects the soil microbes from the sun’s UV rays and keeps moisture in the ground. As the mulch breaks down, it provides a slow-release “drip feed” of organic matter.
- Water consistently. Blossom end rot is often caused by inconsistent watering, not just a lack of calcium. If the soil goes from bone-dry to soaking-wet, the plant cannot transport calcium to the fruit properly.
- Feed the leaves. Use a foliar spray (spraying the leaves) with diluted seaweed or fermented plant juice early in the morning. The plant can absorb nutrients through its pores (stomata) much faster than through its roots.
- Inoculate your roots. When you transplant your peppers, sprinkle some mycorrhizal fungi into the hole. These fungi form a symbiotic relationship with the roots, essentially acting as an extension of the root system to find water and nutrients.
Advanced Considerations: The JADAM Method
For those of you who really want to take it to the next level, I suggest looking into JADAM Liquid Fertilizer (JLF). This is a practice that comes from South Korea and focuses on “anaerobic” fermentation. Unlike aerated compost tea, which requires an air pump, JLF involves putting organic material (like old fruit, grass, or even fish scraps) into water and letting it rot for months.
It creates a “soup” that is incredibly dense in nutrients and specialized microorganisms. The secret ingredient is often a handful of “leaf mold” from a local forest, which introduces the indigenous microorganisms (IMO) that are already adapted to your local climate. This is the ultimate way to create a self-sustaining garden that requires zero outside inputs.
Example Scenario: The Habanero Boost
Let’s look at a real-world example. Imagine you have a habanero plant that has reached about 12 inches (30 cm) in height but has stopped growing and the lower leaves are turning a pale lime green.
The Diagnosis: The plant is hungry for nitrogen and perhaps some magnesium.
The Plan:
1. Apply a soil drench of Weed Tea (diluted 1:10) to give it a nitrogen kick.
2. Mix 1 tablespoon of Epsom salts into 1 gallon (4 liters) of water and spray the leaves.
3. Add a 2-inch (5 cm) layer of finished compost around the base of the plant.
The Result: Within 7 to 10 days, you will notice the leaves turning a deep, rich forest green, and new growth appearing at the terminal buds. This sets the stage for a massive flush of flowers in the coming weeks.

Do you have some charcoal in your house right now? We call charcoal a “miracle leftover” for anyone who wants to be a little more self-sufficient and cut costs. That’s because it can help you with so many different things around the house and garden. You can even use it to make an energy-free fridge. Read More Here...
Final Thoughts
Gardening is a conversation between you and the earth. When you use synthetic chemicals, you are essentially shouting at the plants to grow. But when you use organic fertilizers—your kitchen scraps, your weeds, and your compost—you are listening to the soil and giving it what it needs to thrive on its own.
Your chilli peppers don’t need a lab-grade cocktail to be spicy and productive. They need a living, breathing ecosystem. By brewing your own teas and recycling your waste, you are not just growing food; you are building a legacy of health in your backyard.
I encourage you to start small. Put some banana peels in a jar, start a small compost pile in the corner of the yard, and see how your plants respond. Once you see the “biological gold” in action, you will never want to go back to those blue crystals again. Happy growing, neighbor.