
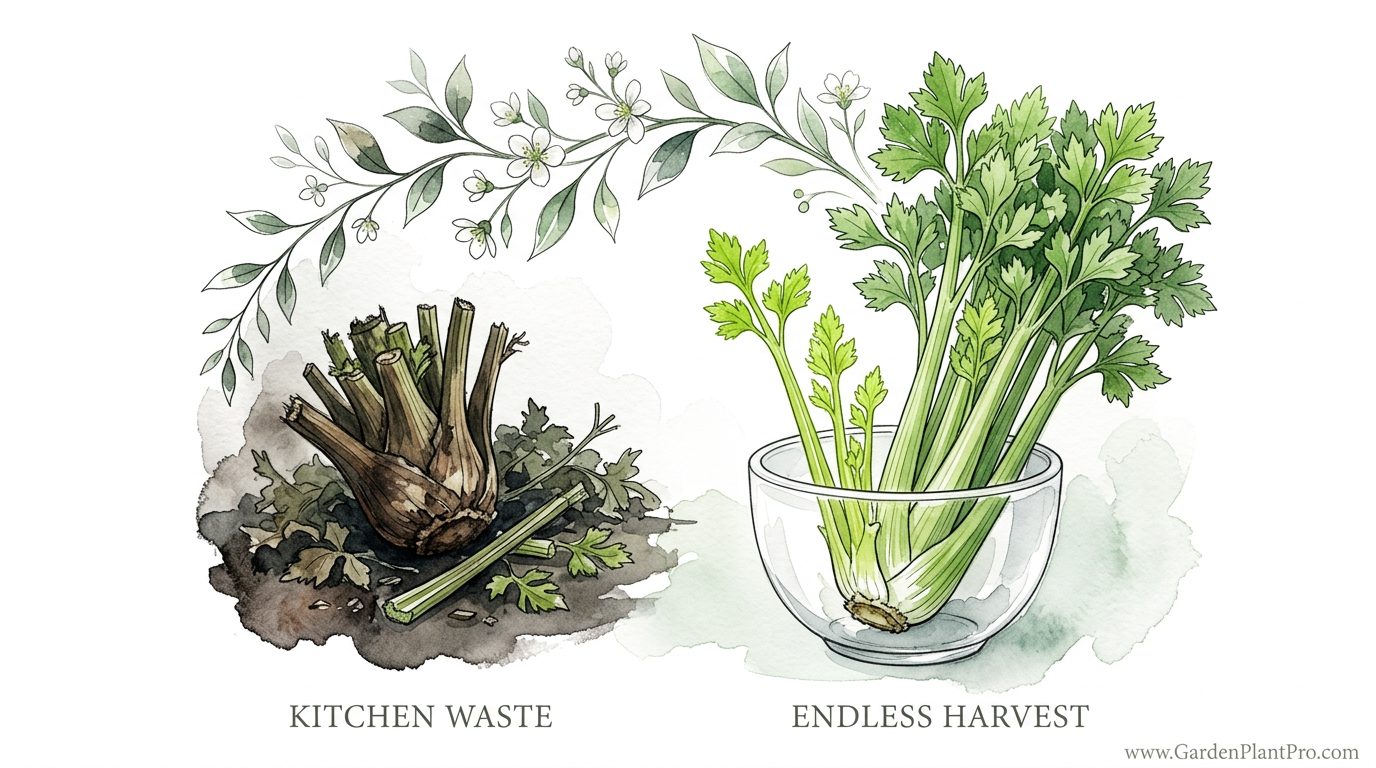
Most people throw away the best part of their celery without realizing it’s a self-replicating food source. Think that celery base belongs in the bin? Think again. With just a glass of water and a little patience, you can turn kitchen waste into a recurring harvest. Discover the simple secret to infinite celery stalks in your own kitchen.
I have spent many decades watching the rhythm of the seasons from my back porch, and if there is one thing I have learned, it is that nature hates to waste a good thing. That bunch of celery you bought at the market isn’t just a snack; it’s a biological powerhouse waiting for a second chance at life. When you cut off that bottom two-inch (5 cm) chunk and toss it, you are throwing away a perfectly good root system and crown.
Regrowing your own vegetables from scraps is one of those old-timer tricks that has found new life in modern kitchens. It is not just about saving a few cents, though that is a nice perk. It is about the satisfaction of seeing life spring from what others call trash. It connects you to your food in a way that a plastic-wrapped grocery store bag never can. Let me walk you through how we do this the right way, so you can avoid the soggy messes and actually get something worth eating.
How To Regrow Celery From Scraps At Home
Regrowing celery from scraps is the process of using the basal plate—the very bottom of the celery bunch—to stimulate new growth. This works because celery is a biennial plant with a dense crown at its base that contains undifferentiated cells capable of producing new stalks and roots. In the gardening world, we call this vegetative propagation. It is a way to bypass the long, finicky process of starting celery from tiny seeds, which can take up to 21 days just to sprout.
In real-world terms, this method is a bridge between kitchen waste and an endless harvest. You start the process in a simple vessel of water on your windowsill, and once the plant shows it has the “will to live” by pushing out new green leaves, you move it into a pot or your garden bed. It is a favorite project for those with limited space, such as apartment dwellers, or for folks like us who just want to see how much we can get out of a single grocery store purchase.
Think of the celery base as a battery. It has stored energy from its first life in the field. When you provide it with fresh water and light, it uses that energy to reboot. However, unlike a battery, this one can recharge itself indefinitely if you give it the right soil and nutrients later on. It is a simple, low-risk way to dip your toes into the world of organic gardening without needing a tractor or a greenhouse.
The Step-by-Step Resurrection: From Glass to Garden
Getting started is as easy as making a sandwich, but there are a few nuances that make the difference between a thriving plant and a smelly science project. Follow these steps to ensure your celery makes a full recovery.
Step 1: The Initial Cut
When you prepare your celery for a recipe, leave at least 2 to 3 inches (5 to 8 cm) of the base intact. Use a clean, sharp knife to make a level cut across the stalks. A clean cut prevents jagged edges where bacteria can hide and start to rot the crown. Make sure the very bottom “plate” of the celery—where the roots once were—is healthy and firm, not soft or blackened.
Step 2: The Water Bath
Place the base in a shallow bowl or a wide-mouthed jar. Add enough water to submerge the bottom 1 inch (2.5 cm) of the base. You want the top part of the cut stalks to remain dry. Some gardeners like to use toothpicks to suspend the base so it doesn’t touch the bottom of the glass, which can help with airflow, but a shallow dish usually works just fine. Use filtered water if your tap water is heavily chlorinated, as the chemicals can sometimes stunt early growth.
Step 3: Sunlight and Freshness
Place your container on a windowsill that gets bright, indirect light. Direct, scorching sun can sometimes cook the water and kill the tender new cells. The most critical part of this stage is maintenance. Change the water every single day or at least every 48 hours. Stagnant water is an invitation for rot and slime. Within 5 to 7 days, you should see tiny, pale green or yellow leaves emerging from the center of the base.
Step 4: Transplanting to Soil
Once you see new leaves and perhaps some small white root nubs appearing at the bottom, it is time to give the plant some real food. Moving to soil is essential because water alone doesn’t have the nutrients needed to grow thick stalks. Use a pot that is at least 8 to 10 inches (20 to 25 cm) deep with good drainage holes. Fill it with a high-quality potting mix enriched with compost. Bury the base so that only the new green growth is sticking out above the soil line.
Environmental Factors and Garden Conditions
Celery is a bit of a prima donna when it comes to its environment. It originated as a marshland plant, which means it likes things cool and damp. If you can replicate those “boggy” conditions, your regrown celery will be much happier. I have found that keeping the soil consistently moist is the number one secret to success.
Temperature is another big factor. Celery thrives when the thermometer stays between 60°F and 75°F (15°C to 24°C). If it gets much hotter than 80°F (27°C), the stalks can become bitter and stringy, or the plant might “bolt,” which means it tries to grow a flower stalk and go to seed. In hotter climates, I suggest giving your celery some afternoon shade to keep its roots cool. In cooler regions, you can grow it indoors year-round or move it outside once the danger of a hard frost has passed.
Soil quality shouldn’t be overlooked either. Since you are asking this plant to grow a second time, it needs plenty of fuel. A soil pH between 6.0 and 7.0 is the sweet spot. If your soil is too acidic, you can add a bit of lime; if it’s too alkaline, some organic peat or sulfur can help. But for most of us, a good helping of well-rotted manure or garden compost mixed into the soil will do the trick just fine.
The Practical Benefits of Regrowing Scraps
Why bother regrowing when celery is relatively cheap at the store? Well, there are several reasons why this practice has a permanent spot in my garden. First, it is a zero-waste win. Every time you regrow a base, you are keeping organic matter out of the landfill and putting it to work for you.
Second, the nutritional value of home-grown celery leaves is staggering. Most people don’t realize that celery leaves contain significantly more nutrients than the stalks. We are talking about nearly 80 times more carotene and 14 times more Vitamin C. When you regrow from scraps, you get a constant supply of these potent greens to toss into soups, salads, or smoothies.
Finally, it is a magnificent teaching tool. If you have grandkids or children around, there is no better way to show them the “magic” of nature. Watching a dormant brown base sprout vibrant green life in just a few days is enough to spark a lifelong interest in gardening and sustainability. It is also a handy “emergency” crop—if you just need a few leaves for a mirepoix or a garnish, you can snip them right off your windowsill plant without having to buy a whole new bunch.
Common Challenges and How to Fix Them
I’ve seen plenty of folks get discouraged because their celery turned into a mushy mess. Let’s talk about the pitfalls and how to avoid them. The most common issue is rot and slime. This usually happens because the water wasn’t changed often enough or the entire base was submerged too deep. If you see the outer stalks turning brown and slippery, peel them away immediately and give the base a gentle rinse under the tap.
Another common complaint is spindly, weak growth. This is almost always a light issue. If your celery is reaching and looks pale, it needs more sun. Move it to a south-facing window or consider a small LED grow light if your kitchen is particularly dark. Remember, we want sturdy, thick stalks, not long, thin threads.
DIY PROJECT: Collect rainwater no matter where you live...

This DIY project is the best way to legally collect rainwater NO MATTER where you live. Get chlorine-free water, cut down on your water bills, and have enough for an emergency situation or to water your garden. Read More Here...
Then there are the pests. Even indoors, aphids can find their way to those tender new leaves. They look like tiny green or black dots on the underside of the foliage. A simple spray of water and a drop of organic dish soap can usually knock them back. If you move your plant outdoors, keep an eye out for slugs and snails—they love the moist, cool environment of a celery pot just as much as the plant does.
Limitations: What to Realisticially Expect
I like to be honest with my neighbors, so I’ll tell you straight: regrown celery will rarely look exactly like the massive, perfectly uniform bunches you see at the supermarket. Commercial growers use specific varieties and intense fertilization to get those results. Your regrown celery will likely produce smaller, more slender stalks and a lot more leafy growth.
| Feature | Store-Bought Bunch | Regrown from Scraps |
|---|---|---|
| Stalk Thickness | Thick and uniform | Slender and varied |
| Leaf Production | Minimal (mostly trimmed) | Abundant and vigorous |
| Flavor Intensity | Mild to moderate | Very strong and “herbal” |
| Time to Harvest | Instant (purchased) | 2-4 months for stalks |
| Cost | Retail price | Essentially free |
The flavor of regrown celery is often much more intense. It has a peppery, herbal kick that makes it fantastic for cooking but might be a bit strong for someone who only likes mild, watery celery. Think of it more as a “cutting celery” or a culinary herb rather than a main-dish vegetable. If you want those giant, pale stalks, you would need to “blanch” them by blocking the light from the stems with cardboard or soil as they grow, but that is a bit more work than most scrap-gardeners want to take on.
Practical Tips and Best Practices
After years of trial and error, I have a few “pro” tips for you to keep in your back pocket. First, don’t wait too long to transplant. Many people leave the celery in water for weeks. While it might live, it won’t thrive. As soon as you see those first few roots or a couple of inches of new green growth, get it into some soil. It needs the minerals and “good bacteria” found in the dirt to build strong cell walls.
- Water Quality: If your tap water is hard or high in minerals, try using rainwater or let your tap water sit out overnight to let the chlorine dissipate.
- Feeding: Celery is a “heavy feeder.” Once it’s in soil, give it a diluted liquid organic fertilizer every two weeks. Look for something with a decent amount of nitrogen for leaf growth.
- Harvesting: You don’t have to wait for the whole plant to be “ready.” snip off individual outer stalks as you need them. This “cut and come again” method encourages the plant to keep producing from the center.
- Mulching: If you plant it outside, put a layer of straw or dried leaves around the base. This keeps the moisture in and the weeds out, which is important since celery has shallow roots that don’t like competition.
Advanced Considerations: Taking it Further
Once you’ve mastered the basic windowsill method, you might want to try some more advanced techniques. One interesting approach is the Kratky Method of hydroponics. Instead of just a bowl of water, you use a jar with a nutrient solution and a net pot. This allows the roots to grow into the liquid while the crown stays dry, significantly reducing the risk of rot while providing the plant with the food it needs to grow larger stalks without soil.
You can also experiment with different varieties. While you are likely starting with standard “Tall Utah” or “Pascal” types from the store, you can apply these same regrowth principles to organic heirloom varieties you might find at a farmer’s market. Some of the red-stalked or “cutting” varieties regrow with even more vigor and offer a beautiful splash of color to your kitchen windowsill.
If you’re serious about a large harvest, consider using your regrown plants as “mother plants” to produce seeds. Celery is a biennial, so in its second year of growth, it will produce beautiful white umbels of flowers. These will eventually turn into celery seeds. You can harvest these for seasoning (homemade celery salt!) or use them to start an entirely new generation of plants from scratch the following spring.
A Realistic Example: The Two-Month Timeline
Let’s look at how this typically plays out in a real kitchen. Suppose you buy a bunch of celery on the first of the month. You cut the base and put it in water that same evening. By the 7th of the month, you’ll see that little green heart pushing upward. By the 15th, you likely have 2 inches (5 cm) of new growth and a few tiny root nubs.
On the 16th, you move it into a 1-gallon (3.8 liter) pot with fresh compost. For the next month, you keep it watered and give it a little organic liquid feed. By the end of the second month, you won’t have a giant supermarket bunch, but you will have a cluster of 6 to 8 slender, crunchy stalks and a massive head of flavorful leaves. That’s enough to flavor three or four big pots of stew or provide the crunch for a week’s worth of tuna salads. All of that came from something you would have normally thrown in the trash.
Final Thoughts
Regrowing celery from scraps is a simple yet profound way to interact with the natural world. It reminds us that there is incredible potential in the things we often overlook. By shifting our perspective from “kitchen waste” to “endless harvest,” we become more than just consumers; we become participants in the cycle of growth. It is a rewarding hobby that pays off in fresh flavors, higher nutrition, and the quiet joy of a green thumb.
Whether you are looking to save money, reduce your environmental footprint, or just have a bit of fun on your windowsill, I encourage you to save that next celery base. Give it a little water, a little light, and a little time. You might be surprised at how much life is left in those scraps. Once you see that first green shoot emerge, you’ll be hooked on the magic of regrowing your own food.
As you get comfortable with celery, don’t stop there. Many other vegetables like green onions, romaine lettuce, and even leeks can be regrown using similar methods. Each one offers its own lessons in patience and soil health. So, next time you’re at the cutting board, take a moment to look at what you’re about to discard. There just might be a whole new garden waiting to happen.