
Why your back-breaking work is actually ruining your carrot crop and causing those crooked roots. Most gardeners think they need to till the earth to the core to get long, straight carrots. The truth? You are just waking up weed seeds and destroying soil structure. Switch to strategic planting and watch your roots dive deep without the sweat.
For years, I followed the old-school wisdom. I’d be out there in the spring, wrestling with a heavy tiller, trying to turn my garden soil into a fine powder. I thought that by pulverizing every clod of earth, I was giving my carrots a clear path to grow down. But every year, I ended up with a crop that looked more like a collection of twisted pretzels than the prize-winning roots I saw in the seed catalogs. Plus, my back would ache for a week, and I’d spend the rest of the season fighting a never-ending war against weeds.
Then I started watching how nature does it. You don’t see the forest floor being tilled, yet plants grow deep and strong. I realized that by tilling, I was actually creating a “hardpan” layer just below the reach of the blades. When a carrot root hit that solid wall, it had nowhere to go but sideways. I was also bringing thousands of dormant weed seeds to the surface, giving them the perfect conditions to sprout and choke out my tiny carrot seedlings.
If you’re tired of the labor and the lackluster results, let’s talk about a better way. We’re going to look at how you can grow the straightest, sweetest carrots you’ve ever tasted by doing less work, not more. It’s all about working with the soil biology instead of fighting against it.
How To Grow Straight Carrots Without Tilling
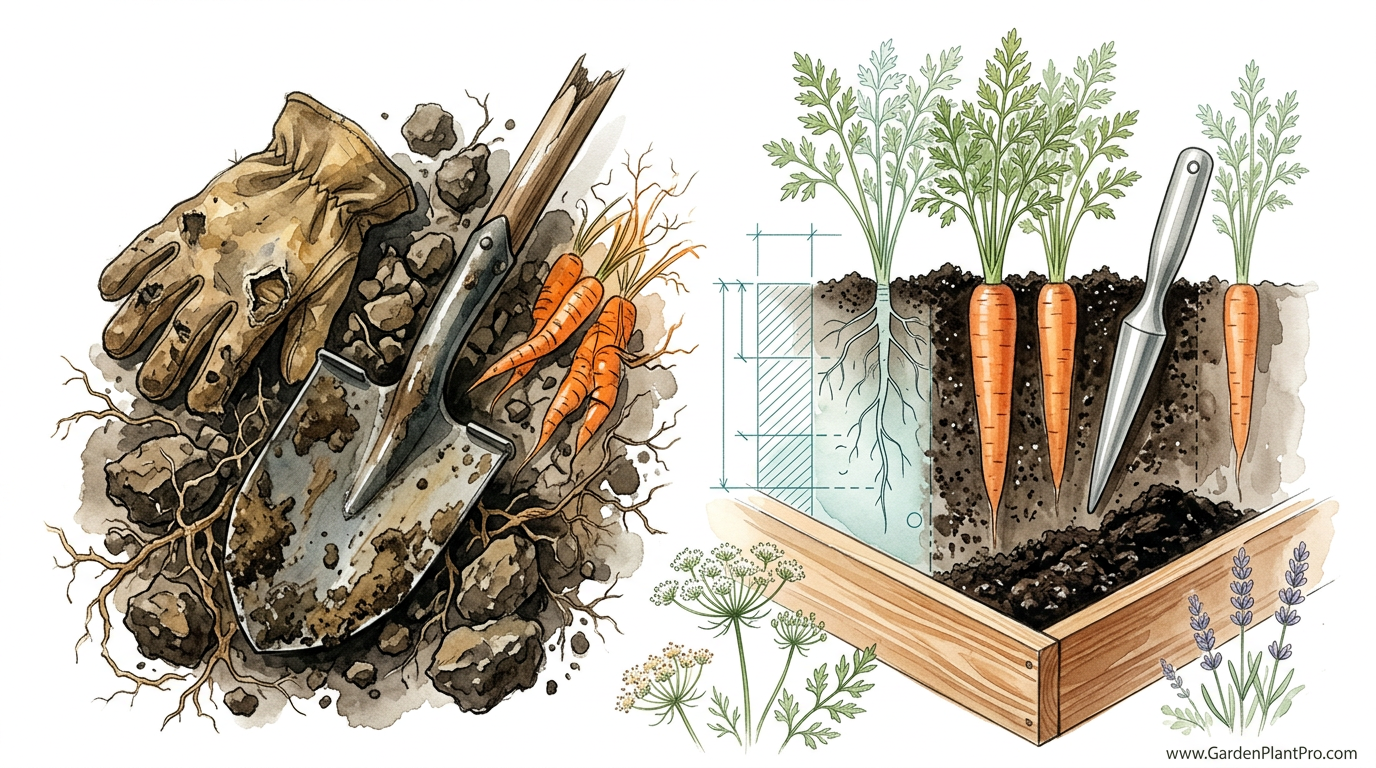
Growing straight carrots without tilling means shifting your focus from “working the soil” to “building the soil.” In a traditional garden, the shovel is the main tool. In a no-till or “no-dig” system, the main tool is organic matter—specifically high-quality compost. Instead of digging down to loosen the earth, you are adding layers on top that mimic the natural process of decomposition.
This method works because it preserves the existing soil structure. Soil is more than just dirt; it is a complex network of fungal hyphae, worm tunnels, and microscopic pore spaces that allow air and water to move. When you till, you collapse these tunnels and slice through the fungal networks that help plants absorb nutrients. A no-till bed remains porous and spongy, allowing the carrot’s taproot to slide through the earth with minimal resistance.
In real-world terms, this often involves “sheet mulching” or “compost mulching.” You start by suppressing any existing weeds with a layer of cardboard or thick paper, then you top that with 4 to 6 inches (10 to 15 cm) of well-rotted compost. You sow your seeds directly into that compost. The compost provides a perfectly loose medium for the early stages of growth, and as the root reaches the soil below, it follows the existing paths carved out by worms and previous plant roots.
The Science of Why Tilling Fails the Carrot
To understand why no-till is superior for carrots, we have to look at the anatomy of the root and the biology of the soil. A carrot is a taproot. Its primary goal is to drive straight down into the earth to find moisture and minerals. If that sensitive growing tip encounters a physical obstruction—like a rock, a clump of unrotted manure, or a layer of compacted clay—it will pivot. This is what causes forking and “j-hooking.”
When you use a mechanical tiller, the spinning tines only go so deep. Usually, they reach about 6 to 8 inches (15 to 20 cm). Directly beneath that, the weight and vibration of the machine create a compressed layer known as a “plow pan.” Your carrot grows beautifully through the loose topsoil, hits that plow pan at the three-month mark, and suddenly turns into a gnarled mess.
Furthermore, tilling introduces a massive flush of oxygen into the soil. This causes a “burn-off” of organic matter as bacteria go into a feeding frenzy. While this releases a quick burst of nitrogen, it leaves the soil depleted and prone to crusting. Carrots have notoriously weak “shoulders”—the tiny leaves that first emerge from the seed. If the soil surface crusts over because the organic matter has been burned away, those seedlings will die before they ever see the sun.
How the No-Till Carrot System Works Step by Step
Transitioning to a no-till method for your root crops isn’t complicated, but it does require a change in timing and materials. Here is how I set up my beds for a successful carrot run.
Step 1: Site Preparation and Weed Suppression
If you are starting with a weedy patch or a section of lawn, do not reach for the spade. Instead, mow the area as short as possible. Lay down a layer of plain brown cardboard, making sure to overlap the edges by at least 6 inches (15 cm) so no light gets through. This cardboard will eventually rot away, but in the short term, it kills the grass and weeds while inviting earthworms to come up and feast.
Step 2: Layering the Growing Medium
Apply a thick layer of compost over the cardboard. I recommend at least 4 inches (10 cm), but 6 inches (15 cm) is even better for long varieties like Imperator. This compost needs to be “clean”—meaning it shouldn’t have large chunks of wood or half-rotted stems. If your compost is lumpy, pass it through a half-inch (1.3 cm) screen. This provides the “tilth” that carrots love without the need for mechanical digging.
Step 3: Choosing the Right Variety
Not all carrots are built for the same soil. If you are just starting your no-till journey and your underlying soil is still a bit heavy, choose a variety that is naturally shorter or more wedge-shaped.
- Nantes: These are cylindrical and blunt-tipped. They are incredibly sweet and tend to handle less-than-perfect soil better than the long, skinny types.
- Chantenay: These are short and stout with a wide shoulder. They are the “powerhouses” of the carrot world, capable of pushing through heavier clay.
- Danvers: A classic “bunny” carrot. It is tapered and rugged, making it a great choice for transitioning soils.
- Imperator: These are the long, slender carrots you see in grocery stores. Only grow these if you have at least 10 inches (25 cm) of very loose, sandy loam or deep compost.
Step 4: Sowing the Seeds
Carrot seeds are tiny—about the size of a poppy seed. It is easy to over-sow them, which leads to crowding and stunted roots. I like to make a shallow “v” in the compost with a stick, no more than half an inch (1.3 cm) deep. Space your rows about 8 to 12 inches (20 to 30 cm) apart. Sprinkle the seeds as thinly as you can. Some folks mix the seeds with a bit of dry sand to help spread them out evenly.
Step 5: The Secret to Germination
Carrots can take anywhere from 7 to 21 days to germinate, depending on the temperature. If the soil surface dries out even once during this window, the seeds will die. This is where most gardeners fail. To prevent this, I use the “board method.” After sowing and watering, lay a scrap piece of lumber or a damp piece of burlap directly over the row. This traps the moisture and keeps the soil cool. Check every couple of days, and the moment you see green “hairs” poking up, remove the cover.
Benefits of the No-Till Approach
The most obvious benefit is the reduction in labor. You aren’t spending your weekends wrestling with a machine or a heavy fork. But the advantages go much deeper than just saving your back.
Improved Water Retention: Because you haven’t destroyed the soil structure, the earth acts like a sponge. The layer of compost on top acts as a natural mulch, preventing evaporation. I find that I have to water my no-till carrots about half as often as my tilled ones.
Fewer Weeds: By not turning the soil, you leave the weed seeds buried deep where they can’t sprout. Any seeds that blow in from the top are easily pulled from the loose compost. Over time, your “weed seed bank” at the surface will be exhausted, and you’ll find yourself barely weeding at all.
DIY PROJECT: Collect rainwater no matter where you live...

This DIY project is the best way to legally collect rainwater NO MATTER where you live. Get chlorine-free water, cut down on your water bills, and have enough for an emergency situation or to water your garden. Read More Here...
Superior Flavor and Nutrition: Carrots grown in microbially rich, undisturbed soil often have a more complex flavor. The fungal networks in the soil help the plants access trace minerals that are often missing in “dead,” tilled soil. Plus, the absence of a hardpan allows the roots to grow deep into the subsoil, where they can pull up moisture and nutrients during dry spells.
Challenges and Common Mistakes
While no-till is simpler, it isn’t “set it and forget it.” There are a few hurdles you might face, especially in the first year.
The Nitrogen Gap: Sometimes, if you use compost that isn’t fully “finished” or has too much woody material, the bacteria breaking it down will “rob” nitrogen from your carrots. This results in pale, yellowish tops and tiny roots. To avoid this, make sure your compost is dark, crumbly, and smells like a forest floor—not like manure or rot.
Surface Crusting: Even with compost, a heavy rain followed by hot sun can create a hard crust. If you aren’t using the burlap or board method, that crust can trap the seedlings underground. If you notice a crust forming, use a very fine mist from your hose to soften it up every morning until the seedlings emerge.
Pest Habitat: Slugs love the moist, cool environment under the burlap or boards. If you have a major slug problem, you might need to use a lightweight floating row cover instead of a solid board. The row cover still keeps things moist but allows for more airflow and makes it harder for slugs to hide.
Limitations: When No-Till May Not Be Ideal
There are certain situations where a pure no-till approach might need a little help. If you are dealing with **severe compaction** from heavy machinery or if you have a “sod-bound” area with perennial weeds like Bindweed or Quackgrass, a one-time aeration might be necessary.
In these cases, I suggest using a **broadfork**. This tool allows you to lean back and lift the soil, cracking it open without turning it over. It’s like a deep massage for the earth. You aren’t destroying the structure, but you are providing some initial air pockets for the carrots to follow.
Another limitation is the cost of compost. If you have a very large garden, buying enough high-quality compost to cover every bed 4 inches (10 cm) deep can be expensive. In that case, you might focus your no-till efforts on just the carrot and parsnip beds, where it makes the biggest difference in crop quality.
Comparison: Traditional Tilling vs. Strategic No-Till
| Feature | Traditional Tilling | No-Till Compost Mulching |
|---|---|---|
| Labor Intensity | High (annual digging/tilling) | Low (layering and light weeding) |
| Weed Pressure | High (stirs up dormant seeds) | Minimal (suppresses existing seeds) |
| Soil Structure | Pulverized and prone to collapse | Preserved and aerated by biology |
| Root Quality | Variable; often forked by hardpan | High; straight and deep |
| Water Usage | Higher (surface dries out fast) | Lower (organic matter holds water) |
Practical Tips and Best Practices
If you want to really master the art of the straight carrot, keep these tips in your back pocket. They are the little things that make a big difference over a long season.
- Water Deeply, Not Frequently: Once your carrots are about 2 inches (5 cm) tall, stop misting them every day. Instead, give them a deep soak once or twice a week (depending on your climate). This encourages the root to “chase” the water down deep into the soil. If you only water the surface, the root will stay shallow and hairy.
- Thinning is Non-Negotiable: It’s hard to pull out perfectly healthy seedlings, but if you don’t, you’ll get a tangled mess. Aim for a final spacing of 2 to 3 inches (5 to 7 cm) between plants. Do your thinning on a cloudy day and water immediately afterward to settle the soil back around the remaining roots.
- Avoid Fresh Manure: Never put fresh animal manure on your carrot beds. The high nitrogen will cause the carrots to grow “hairy” with too many side roots, and the salt content can burn the delicate taproot, causing it to fork. Always use well-composted material.
- The “Shoulder” Cover: Sometimes the top of the carrot root will poke out of the soil as it grows. If the sun hits it, it will turn green and bitter. Use a little extra compost or some clean straw to “hill” up around the base of the greens if you see orange shoulders appearing.
Advanced Considerations: Biological Tilling
For those who want to take their soil to the next level, you can use plants to do the digging for you. This is often called “biological tilling.” In the season before you plan to grow carrots, plant a cover crop of **Tillage Radishes** (also known as Daikon or forage radishes).
These radishes have incredibly powerful taproots that can drill through almost any compaction. In the winter, the radish will die back, leaving a large hole filled with rotting organic matter. The following spring, you can plant your carrots directly into those “pre-drilled” holes. The carrot root will follow the path of least resistance left by the radish, diving deeper than any tiller could ever reach.
Another advanced technique is **succession planting**. Because no-till beds are so easy to manage, you can sow a new row of carrots every 3 weeks from early spring until mid-summer. This ensures you have a continuous harvest of young, tender roots instead of one giant crop that gets woody in the heat of August.
Example Scenario: The 4-Foot Bed Success
Imagine a standard 4-foot by 10-foot (1.2 m by 3 m) garden bed. In a traditional system, you’d spend an hour tilling it, another hour raking it flat, and then hours every month weeding it.
Using the no-till method, you spend 30 minutes laying cardboard and 45 minutes shoveling on 6 inches (15 cm) of compost. You sow your rows, cover them with burlap, and walk away. Three weeks later, you have a perfect “lawn” of carrot seedlings with almost zero weed competition. By mid-summer, you are pulling 8-inch (20 cm) carrots that are as straight as pencils. Because you never stepped in the bed, the soil stayed loose and airy for the entire four-month growing cycle.
The total “work time” for that bed over the whole season is likely less than three hours. That’s the power of working with the system instead of trying to dominate it.
Final Thoughts
Stepping away from the tiller can feel a bit strange at first. We’ve been told for generations that a “clean” garden is one that has been turned over and raked smooth. But when you look at the quality of the roots you get from an undisturbed bed, you’ll never go back. Your carrots will be straighter, your soil will be healthier, and you’ll have more time to actually enjoy the fruits of your labor.
Remember that carrots are a lesson in patience. They take their time to wake up, and they need consistent moisture in those first few weeks. But if you give them a loose, compost-rich environment and leave the soil structure intact, they will reward you with a harvest that no grocery store can match.

Do you have some charcoal in your house right now? We call charcoal a “miracle leftover” for anyone who wants to be a little more self-sufficient and cut costs. That’s because it can help you with so many different things around the house and garden. You can even use it to make an energy-free fridge. Read More Here...
Don’t be afraid to experiment. Try the board method on one row and burlap on another. See which variety loves your particular patch of earth. Gardening is a lifelong conversation with the land, and the no-till approach is one of the most respectful ways to join that talk. Give your back a rest this season and let the worms and the compost do the heavy lifting. Your carrots—and your spine—will thank you.