
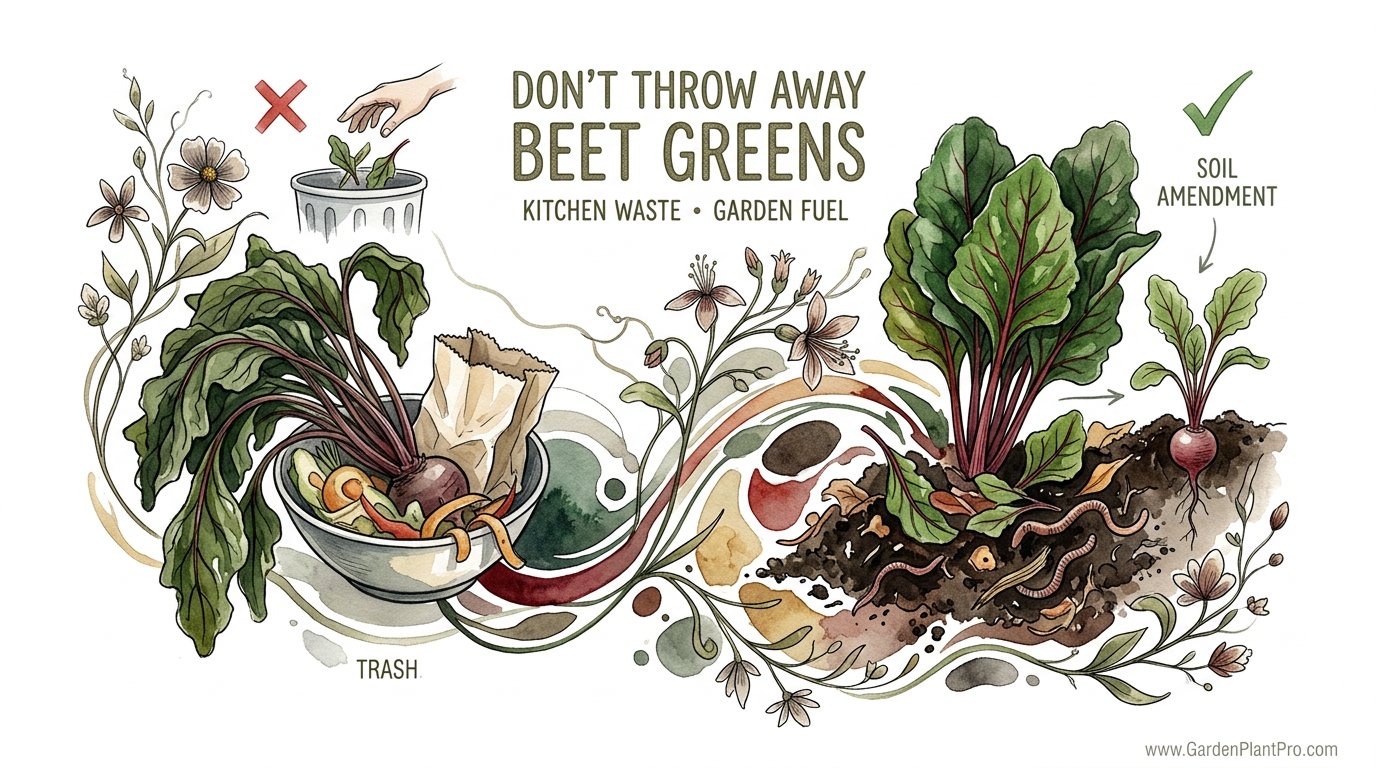
The most nutrient-dense part of your beet harvest is probably currently sitting in your trash can. Stop throwing away half of your harvest! Beet greens are packed with more vitamins than the roots and serve as high-nitrogen fuel for your compost pile. Whether you’re feeding your body or your soil, learn why those ‘scraps’ are actually the most valuable part of the plant.
I’ve spent many years watching folks at the farmers market ask the vendor to hack off the tops of their beets before they bag them up. It always makes me want to reach over and say, “Neighbor, you’re leaving the best part behind!” To a seasoned gardener, the beet is two crops for the price of one. You get the earthy, sweet root that everyone knows, but you also get a leafy green that rivals spinach and Swiss chard in both flavor and nutrition.
The foliage of the beet plant is a gift from the garden that keeps on giving, whether you’re stir-frying them for dinner or tossing the extras into your compost bin to jumpstart the decomposition process. In this guide, I’ll walk you through everything I’ve learned about making the most of these vibrant leaves, from harvesting them without killing the root to using them as high-octane garden fuel.
Don’t Throw Away Beet Greens
Beet greens are the leafy, green foliage that grows directly from the crown of the beet root (Beta vulgaris). They belong to the same family as spinach and Swiss chard, which is why they look and taste so similar. If you’ve ever grown Swiss chard, you’ve essentially grown a beet that was bred specifically for its leaves rather than its root.
These greens exist because they are the solar panels of the plant. They capture sunlight and convert it into the sugars that feed the developing root below. Because they are so active in the plant’s metabolism, they are incredibly rich in minerals and vitamins. In a real-world garden setting, these greens are often the first “real” food you can harvest in the spring when you’re thinning out your rows to give the remaining plants room to grow.
Think of beet greens as a dual-purpose asset. In the kitchen, they provide a tender, slightly earthy vegetable that cooks down in minutes. In the garden, their high nitrogen content makes them a “green” material that can heat up a cold compost pile almost overnight. When you throw them away, you aren’t just wasting food; you’re wasting potential soil health.
How to Harvest and Prepare Beet Greens
Harvesting these leaves is an art. If you take too many, the root won’t have enough energy to grow. If you wait too long, the stems can get woody and the leaves can become a bit bitter.
Thinning for “Baby” Greens
When you plant beet seeds, you’re actually planting a “seed ball” that contains multiple embryos. This means you’ll almost always have clusters of 3 or 4 seedlings popping up in one spot. To get large roots, you have to thin these out so the plants are about 3 to 4 inches (7.5 to 10 cm) apart.
Instead of just pulling them and tossing them, snip these young “thinnings” at the soil line when they are about 4 to 6 inches (10 to 15 cm) tall. These baby greens are the most tender and sweet. They don’t even need cooking; just toss them into a salad for a pop of color and a mild, earthy crunch.
The One-Third Rule for Mature Plants
If you want to harvest greens while the root is still growing, follow the one-third rule. Never take more than one-third of the foliage from a single plant at one time. Focus on the outer, older leaves and leave the center “heart” intact so the plant can keep producing.
Using a sharp pair of garden snips, cut the leaf stalk about an inch (2.5 cm) above the crown. This prevents you from accidentally nicking the shoulder of the beet, which could cause it to “bleed” or rot. I usually do this in the early morning when the leaves are turgid and full of moisture.
Preparation and Cleaning
Beet greens are notorious for holding onto garden grit. The leaves are often slightly crinkled, making them a perfect hiding spot for soil and the occasional aphid.
- Submerge: Fill a large bowl or your sink with cold water and submerge the greens completely.
- Agitate: Swish them around vigorously to knock loose any dirt.
- Lift: Always lift the greens *out* of the water rather than draining the water over them. This leaves the heavy sand and grit at the bottom of the bowl.
- Repeat: I usually do this twice. Gritty greens are a quick way to ruin a good meal.
The Nutritional and Practical Benefits
It might surprise you to learn that the greens are actually more nutrient-dense than the roots in several categories. While the root is famous for its betalains and nitrates, the leaves are where the vitamins live.
A Vitamin Powerhouse
Beet greens are an exceptional source of Vitamin K, which is essential for bone health and blood clotting. A mere 100 grams of cooked beet greens can provide over 300% of your daily recommended allowance of Vitamin K. They are also packed with Vitamin A (in the form of beta-carotene) for eye health and Vitamin C for immune support.
In my experience, they are also one of the best plant-based sources of iron, even surpassing spinach. If you struggle with low iron, adding these to your diet is a natural way to boost your levels. They also contain lutein and zeaxanthin, two antioxidants that are crucial for protecting your vision as you age.
Garden Fuel: The Nitrogen Factor
From a gardening perspective, beet greens are “nitrogen gold.” In composting terms, they have a Carbon-to-Nitrogen (C:N) ratio of approximately 11:1 to 15:1. This makes them a “hot” green material.
When you add a large mass of fresh beet tops to your compost pile, the high nitrogen content provides the protein that microbes need to reproduce rapidly. This leads to a spike in the internal temperature of the pile, which helps break down “brown” materials like straw, dried leaves, or shredded cardboard. It’s like adding high-octane fuel to a fire.
Challenges and Common Mistakes
Working with beet greens isn’t without its hurdles. There are a few common pitfalls that can turn a great harvest into a mess.
Dealing with Leaf Miners
The most common headache with beet greens is the leaf miner. These are the larvae of a small fly that lays eggs on the underside of the leaves. The tiny maggots tunnel between the upper and lower layers of the leaf, creating “blotches” or “serpentine” white tracks.
DIY PROJECT: Collect rainwater no matter where you live...

This DIY project is the best way to legally collect rainwater NO MATTER where you live. Get chlorine-free water, cut down on your water bills, and have enough for an emergency situation or to water your garden. Read More Here...
A common mistake is thinking the leaves are diseased and spraying them with fungicide. In reality, it’s a pest. If you see these tunnels, you must pick off the affected leaves immediately and destroy them—don’t put them in a cold compost pile or the larvae will just finish their life cycle and return next year. I find that using a lightweight row cover over my beets from the moment they sprout is the only 100% effective way to prevent leaf miners without chemicals.
Storage Errors
One of the quickest ways to ruin beet greens is to store them while they are still attached to the root. The root is a storage organ, and it will actually “steal” moisture from the leaves to keep itself plump.
Always separate the greens from the roots as soon as you get them into the kitchen. Leave about an inch (2.5 cm) of stem on the root to prevent it from bleeding, but the greens should be cut off completely. If you store them together in the fridge, the greens will wilt and turn slimy within 48 hours, while the beet root will start to get soft.
Limitations: When Not to Use Beet Greens
While I love them, there are a few situations where you should be cautious or skip the greens entirely.
High Oxalate Content
Like their cousins spinach and chard, beet greens are high in oxalates. For most folks, this isn’t an issue. However, if you are prone to calcium-oxalate kidney stones, you should talk to your doctor about how much of these greens you should be eating. Cooking them (boiling or steaming) and discarding the water can help reduce the oxalate levels significantly, but it’s still something to keep in mind.
Fungal Infections
If your beet leaves have small, tan spots with a distinct reddish-purple border, you’re likely looking at Cercospora leaf spot. This is a fungal disease that thrives in warm, humid weather.
While you *can* technically eat leaves with minor spots, I wouldn’t recommend it. More importantly, you should never put diseased leaves into your compost pile unless you are a master of “hot” composting (reaching temperatures above 140°F or 60°C). Most backyard piles don’t get hot enough to kill fungal spores, and you’ll just end up spreading the disease back onto your garden next year with your finished compost.
Comparison: Kitchen Waste vs. Garden Fuel
Sometimes you have to decide where your beet greens will do the most good. If you have a massive harvest, you might not be able to eat them all. Here is how they stack up in different roles.
| Feature | As Kitchen Food | As Garden Fuel (Compost) |
|---|---|---|
| Primary Value | Vitamins K, A, C, and Iron | High Nitrogen for heat |
| Preparation | Extensive washing required | Rough chop, no washing |
| Best Variety | ‘Lutz Green Leaf’ or ‘Bull’s Blood’ | Any high-foliage variety |
| Risk Level | Low (if no oxalates issues) | High (if fungal disease present) |
Practical Tips and Best Practices
If you want to master the art of the beet harvest, here are a few “neighborly” tips I’ve picked up over the decades.
- Succession Planting: Don’t plant all your beets at once. Plant a small row every 2 or 3 weeks. This ensures a steady supply of tender young greens throughout the season rather than 50 pounds of greens all at once that you can’t possibly eat or process.
- The Damp Paper Towel Trick: To keep greens fresh in the fridge for up to a week, wash them, spin them dry, and then roll them loosely in a slightly damp paper towel. Place that roll inside a reusable silicone bag or a plastic bag with a few air holes. This maintains the high humidity they love without making them “wet,” which causes rot.
- Blanch and Freeze: If you have too many greens, blanch them in boiling water for exactly 2 minutes, then plunge them into an ice bath. Squeeze out every drop of water you can, form them into “pucks,” and freeze them. These are perfect for dropping into winter soups or stews later in the year.
- Nitrogen Balancing: When adding beet greens to the compost, remember the “3-to-1” rule. For every bucket of beet greens (green), add three buckets of dry leaves or straw (brown). This prevents the pile from becoming a slimy, smelly mess.
Advanced Considerations for Serious Growers
For those of you who really want to dial in your garden, the way you fertilize your beets will dictate the quality of your greens.
If you go heavy on the nitrogen early in the season, you’ll get massive, beautiful greens but potentially small, hairy roots. If you want a balance, focus on a fertilizer with a higher phosphorus and potassium count (the middle and last numbers on the bag) once the plants are established. This supports root development while still keeping the foliage healthy.
Also, consider the soil pH. Beets are very sensitive to acidic soil. If your soil pH is below 6.0, the greens often turn a sickly purple-red and stop growing. Keeping your soil in the 6.5 to 7.0 range will ensure those leaves stay vibrant and lush. I often add a bit of agricultural lime to my beet beds in the fall to keep the acidity in check for the following spring.
Examples and Scenarios
Let’s look at a typical scenario in a backyard garden. Suppose you have a 10-foot (3-meter) row of beets. You’ve let them grow for about 40 days.
At this stage, the roots are only about the size of a marble, but the greens are 8 inches (20 cm) tall. Most beginners would wait. A seasoned gardener, however, would harvest every other plant. From that 10-foot row, you could easily pull 20 young plants.
This “thinning harvest” might yield about 2 pounds (0.9 kg) of greens. In the kitchen, this is enough for a large family side dish once sautéed with garlic and olive oil. Meanwhile, the beets remaining in the ground now have the space they need to grow into tennis-ball-sized roots. You haven’t lost a single plant; you’ve just started the harvest early.
Later, when you pull the mature beets, you’ll have a second, much larger harvest of greens. If those older leaves are too tough for a salad, they are perfect for a long-simmered “pot liquor” style preparation or for the compost pile. This is how you maximize the square footage of a small garden.
Final Thoughts
I hope this has convinced you to give those beet tops a second look. It’s a bit of a shame that our modern grocery system treats them like trash because they don’t ship well. When they sit on a truck for three days, the greens wilt and make the whole bunch look “old,” so retailers often trim them off before they even hit the shelf. But as a gardener, you have access to the freshest, most vibrant part of the plant that most people never get to taste.

Do you have some charcoal in your house right now? We call charcoal a “miracle leftover” for anyone who wants to be a little more self-sufficient and cut costs. That’s because it can help you with so many different things around the house and garden. You can even use it to make an energy-free fridge. Read More Here...
Start small. The next time you pull a beet, don’t reach for the trash can. Take those leaves inside, give them a good soak, and try them in a simple sauté. Or, if you’re not feeling hungry, chop them up and tuck them under the mulch around your tomato plants. They’ll break down quickly, releasing that nitrogen right where your heavy feeders need it most.
Gardening is all about closing the loops. When we use the “waste” from one part of the plant to feed ourselves or our soil, we’re working with nature instead of against it. Happy growing, and don’t forget to eat your greens!