
One tiny snip is the difference between a dying plant and a kitchen jungle. Most people treat basil like a temporary bouquet, but it’s actually a high-yield factory. If you aren’t ‘topping’ your plants at the right nodes, you are missing out on 90% of your potential harvest. Here is how the pros double their yield every two weeks.
I have spent years watching folks bring home those lush, bushy basil pots from the grocery store, only to see them turn into a spindly, leggy mess within a week. It’s a common heartbreak in the gardening world. We see that beautiful green foliage and we are afraid to touch it with shears, thinking we might kill the very thing we want to eat. But the truth is exactly the opposite: basil is a plant that craves the blade.
In my decades behind the trowel, I have learned that a basil plant is essentially a biological machine programmed to grow upwards as fast as possible to produce seeds. This is called apical dominance. If you let it go, you get one tall, woody stem with a few leaves and a flower spike that ruins the flavor. If you intervene, you hijack that biology and force the plant to grow outward instead of upward.
When you master the art of the snip, you aren’t just taking a few leaves for your Caprese salad; you are sending a signal to the roots to pump more energy into lateral growth. It is the closest thing to “infinite” food we have in the backyard garden. Let’s walk through exactly how to turn one single stem into a multi-branched herb monster that provides more pesto than your freezer can hold.
How To Prune Basil For Infinite Harvest
Pruning basil for an infinite harvest is the practice of strategically removing the growth tips of the plant to encourage branching. In the real world, this is often called “topping.” While a wild basil plant naturally grows as a single vertical pillar, a pruned plant becomes a dense, rounded shrub. This technique is used by commercial growers and hobbyists alike to ensure a steady supply of fresh, tender leaves throughout the entire growing season.
Think of your basil plant like a highway system. The main stem is the interstate. If you don’t block that interstate, all the traffic (nutrients and growth hormones) stays on that one road. When you snip the top off, you effectively put up a “road closed” sign. The traffic has no choice but to take the exit ramps—which, in basil terms, are the tiny leaf buds waiting at every node. Suddenly, those two tiny buds become two new “interstates,” and your yield has literally doubled.
This method is essential because once a basil plant is allowed to reach its full vertical height, it enters its reproductive phase. It produces flowers, the stems become woody, and the leaves develop a bitter, soapy taste as the plant shifts its chemical profile to protect its seeds. Pruning keeps the plant in its juvenile, vegetative state, where the leaves are at their sweetest and most aromatic. Whether you are working with a classic Genovese or a spicy Thai variety, the principles of the node remain the same.
The Anatomy of a Basil Node
Before you ever pick up your snips, you have to know where to look. The secret to the whole process is the “node.” A node is simply the point on the stem where a pair of leaves grows out. If you look closely at that junction, you will see two tiny, microscopic leaves tucked right into the “armpit” of the larger leaves. These are your future branches.
To identify the node, start at the top of the plant and follow the stem downward. You will see pairs of leaves growing opposite each other. The space between these pairs is called the internode. When we prune, we always cut about 1/4 inch (6 mm) above a node. We never cut in the middle of an internode, as this leaves a “dead” stump that can rot and invite disease into the main vascular system of the plant.
I always tell my neighbors to look for the “V” shape. Where the leaves meet the stem, there is a natural cradle. That is where the magic happens. By leaving that cradle intact but removing the stem above it, you are giving those two dormant buds the light and hormonal permission they need to explode into new growth. In a healthy, sun-drenched garden, you can see these buds start to lengthen within 48 hours of a clean cut.
When and How to Begin the Topping Process
Timing is everything when you are trying to establish a high-yield plant. If you wait too long, the plant becomes “leggy”—meaning it has long stretches of stem with no leaves. If you start too early, you might stunt the seedling. The sweet spot is usually when the plant is about 6 to 8 inches (15 to 20 cm) tall and has developed at least three or four sets of “true” leaves.
Your first cut is the most important one. You want to find the central leader—the main vertical stem—and trace it down to the second or third node from the soil. Take your sharpest scissors or use your fingernails to pinch the stem off just above those nodes. You might feel like you are destroying half the plant, but you are actually setting the foundation for a bushier future. By removing that top third, you have now forced the plant to redirect all its energy into the two lower shoots.
Consistency is the second half of the battle. After that first snip, you wait about two weeks. Those two new stems will grow their own sets of leaves. Once they have two or three nodes of their own, you snip them too. Now your two stems have become four. Two weeks later, those four become eight. This exponential growth is why we call it an “infinite” harvest. By mid-summer, a single well-pruned plant can occupy a space 18 inches (45 cm) wide, providing a cup of leaves every single week without slowing down.
Benefits of Strategic Pruning
The most obvious benefit of pruning is the sheer volume of the harvest. A plant that is left to grow naturally might provide 20 or 30 leaves before it bolts. A plant that is pruned correctly can provide hundreds. This is particularly important for gardeners with limited space, such as those growing in containers or on balconies. You get more food out of a smaller footprint.
Beyond volume, pruning significantly improves the health of the plant. Dense, unpruned plants often suffer from poor air circulation. This creates a humid microclimate in the center of the foliage, which is the perfect breeding ground for fungal issues like downy mildew or grey mold. By regularly thinning the top and encouraging a wider structure, you allow more wind and sunlight to reach the inner stems, keeping the plant dry and disease-resistant.
Flavor is the third major advantage. When a basil plant starts to flower, it produces oils that are much more pungent and often unpleasantly bitter. Regular pruning prevents these flowers from ever forming. It keeps the essential oils—the stuff that makes your pesto taste like heaven—concentrated in young, tender leaves. You are essentially tricking the plant into staying young forever, or at least until the first frost of autumn.
Common Mistakes and How to Avoid Them
The biggest error I see beginners make is “leaf-plucking.” People tend to go out and pull the largest leaves from the bottom of the plant because they look the most appetizing. This is a mistake. Those large, bottom leaves are the plant’s solar panels. They are the primary engine of photosynthesis. If you strip the bottom, the plant has no way to generate energy to grow more leaves at the top. Always harvest from the top down, taking the stem with the leaves.
Another common pitfall is the fear of being “too aggressive.” I have seen plants that are 2 feet (60 cm) tall and falling over because the gardener didn’t want to hurt them. You must be ruthless. As long as you leave at least two sets of leaves on the plant, it will almost certainly recover. If you let a plant get too tall and then try to prune it, you often end up cutting into the “woody” part of the stem near the base. New growth rarely emerges from old, brown wood. You want to keep your cuts in the green, flexible tissue.
Finally, many people ignore the flowers until it’s too late. Once you see that little green cone starting to form at the tip of a branch, the plant has already begun its chemical shift. You can’t just snip the flower off at the base; you need to cut the whole stem back to the next node down. This resets the branch’s internal clock and forces it back into “leaf mode.”
DIY PROJECT: Collect rainwater no matter where you live...

This DIY project is the best way to legally collect rainwater NO MATTER where you live. Get chlorine-free water, cut down on your water bills, and have enough for an emergency situation or to water your garden. Read More Here...
Environmental Factors for Fast Regrowth
Pruning is only half the equation; the plant needs the right fuel to grow back after you have “injured” it. Basil is a tropical native, which means it thrives on heat and light. To see that explosive regrowth we want, your basil needs at least 6 to 8 hours of direct sunlight every day. If you are growing indoors, you might need a supplemental grow light to keep the nodes close together and prevent legginess.
Watering is equally critical. Because you are asking the plant to produce a massive amount of foliage in a short time, it needs consistent moisture. However, basil hates “wet feet.” The soil should be well-daging and rich in organic matter. I like to use a layer of mulch—like straw or shredded leaves—to keep the soil temperature even and prevent water from splashing up onto the leaves, which can spread soil-borne diseases. A thirsty plant will wilt and its growth will stall, making your pruning efforts less effective.
Temperature is the final gatekeeper. Basil will stop growing if the nighttime temperatures dip below 50°F (10°C) and will turn black and die at the first hint of frost. If you live in a region with short summers, your pruning schedule needs to be tighter to maximize the yield during the heat of July and August. In warmer climates, you might find that you need to prune every single week just to keep the plant from taking over the garden bed.
Advanced Considerations: Pruning by Variety
Not all basil is created equal, and some varieties require slightly different handling. Genovese and Sweet Basil are the “standard” types that respond perfectly to the topping method described above. They have large internodes that make it easy to see where to cut. However, if you are growing “Spicy Globe” or other dwarf varieties, the nodes are so close together that you might need a pair of precision herb snips rather than your fingers.
Thai Basil and Holy Basil (Tulsi) are much more prone to flowering than their Italian cousins. They are “bolt-happy.” With these varieties, you have to be extra vigilant. I often find myself pinching Thai basil every 4 or 5 days during a heatwave. The stems also tend to get woody much faster, so you have to keep your cuts higher up the plant where the tissue is still succulent and green.
If you find that you simply cannot keep up with the pruning, look into “slow-to-bolt” varieties like ‘Emerald Towers’ or ‘Prospera’. These have been bred specifically to stay in the vegetative stage for longer. They still require pruning to become bushy, but they won’t punish you with bitter flowers if you miss a weekend of maintenance. These are excellent choices for the busy gardener who wants the “infinite” yield with slightly less frequent intervention.
Multiplication: Turning Prunings into New Plants
The “infinite” harvest doesn’t just stop at one plant. One of the best things about the pruning process is that every stem you cut off is a potential new plant. Basil is incredibly easy to propagate from cuttings. Instead of throwing your prunings into the salad bowl, take a few of the 4-inch (10 cm) stems and put them in a glass of clean, room-temperature water.
Remove the lower leaves so no foliage is submerged in the water, and place the glass on a bright windowsill. Within 7 to 10 days, you will see white roots emerging from the submerged nodes. Once those roots are about 2 inches (5 cm) long, you can pot them up in soil. This is how you go from one grocery store pot to a backyard forest of basil without ever buying another seed packet. It is the ultimate trick for the frugal gardener.
When you transplant these new “babies,” remember that they are clones of the parent. If the parent plant was about to flower, the cutting might try to flower too. Be sure to give your new transplants a “topping” snip as soon as they are established in their new pots to encourage that same bushy growth from the start. This cycle can be repeated all summer long, ensuring you have young, vigorous plants ready to go even as the older ones start to tire out.
Practical Tips for the Kitchen Gardener
- Harvest in the morning: This is when the concentration of essential oils is at its peak. The leaves will be turgid and full of moisture, making them much more flavorful for your cooking.
- Use sharp tools: While pinching with fingers works for soft growth, a clean snip with sharp shears heals faster and reduces the risk of tearing the delicate outer skin of the stem.
- Feed the growth: If you are pruning heavily, give your basil a liquid organic fertilizer every 2 to 3 weeks. Look for something with a higher nitrogen content to support all that new leaf production.
- Watch for “suckers”: Sometimes a plant will send out a very fast-growing shoot from the very base. Snip this early to keep the energy balanced across the whole bush.
- Don’t wash until use: If you are harvesting a large amount to store, don’t wash the leaves until you are ready to use them. Moisture on the leaves leads to rapid browning and decay in the fridge.
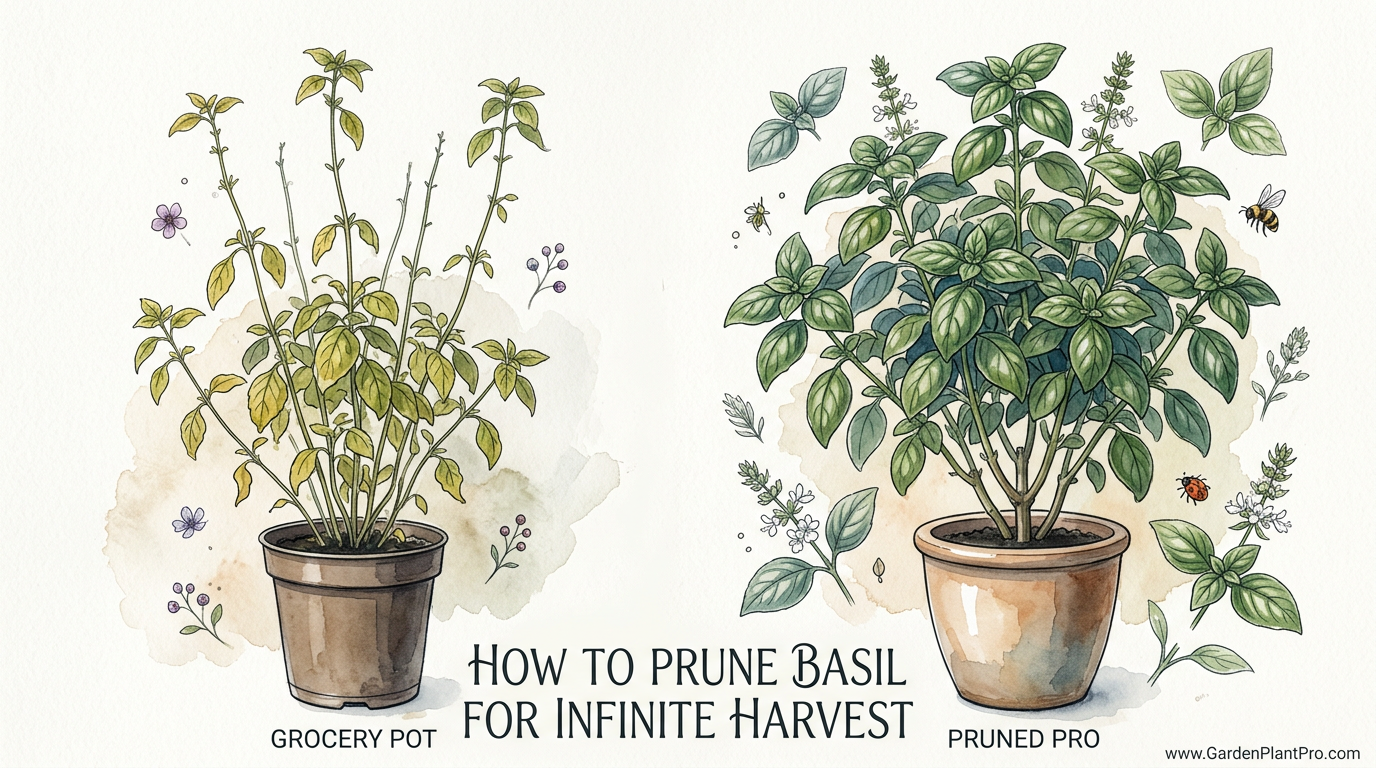
Scenario: The Grocery Pot Rescue
Let’s look at a real-world example. You buy a 4-inch (10 cm) pot of basil from the supermarket. Usually, that pot actually contains 10 to 15 tiny seedlings all crowded together. This is a recipe for disaster. If you leave them there, they will compete for nutrients, get leggy, and die. The “pro” move is to separate them. Gently tip the pot out and tease the roots apart into 3 or 4 separate clumps.
Replant these clumps into larger pots or into the ground with plenty of space between them. Give them a week to overcome the transplant shock, and then apply your first “topping” snip. Within a month, those spindly supermarket stems will have transformed into robust, multi-branched bushes. By mid-summer, you won’t just have rescued a $5 plant; you will have generated $50 worth of fresh herbs.
I have done this every spring for a decade. It is the most satisfying way to start the season. People often ask me why my basil looks like a hedge while theirs looks like a pencil. The answer is always the same: I wasn’t afraid to cut it back when it was small. That early discipline pays off in buckets of leaves by August.
Final Thoughts
Growing a “kitchen jungle” of basil isn’t about having a green thumb or expensive equipment; it is simply about understanding how the plant talks to itself. By using the pruning techniques we have discussed, you are taking control of the plant’s hormones and forcing it to be as productive as possible. Remember that every snip is a request for more, and as long as you provide the sun and water the plant needs, it will answer that request with more leaves than you know what to do with.
Do not be afraid of the blade. Start small, identify your nodes, and watch as your single stems turn into doubles, then quadruples. Gardening is a series of experiments, and basil is one of the most forgiving teachers you will ever find. Once you see that first set of side shoots emerging from the axils, you will be hooked on the process forever.
As the season progresses, you might find yourself exploring other related skills, like advanced soil health or automated irrigation systems to keep up with your plant’s thirst. But for now, just keep your snips sharp and your eyes on the nodes. Your future pesto-self will thank you. Happy gardening!