
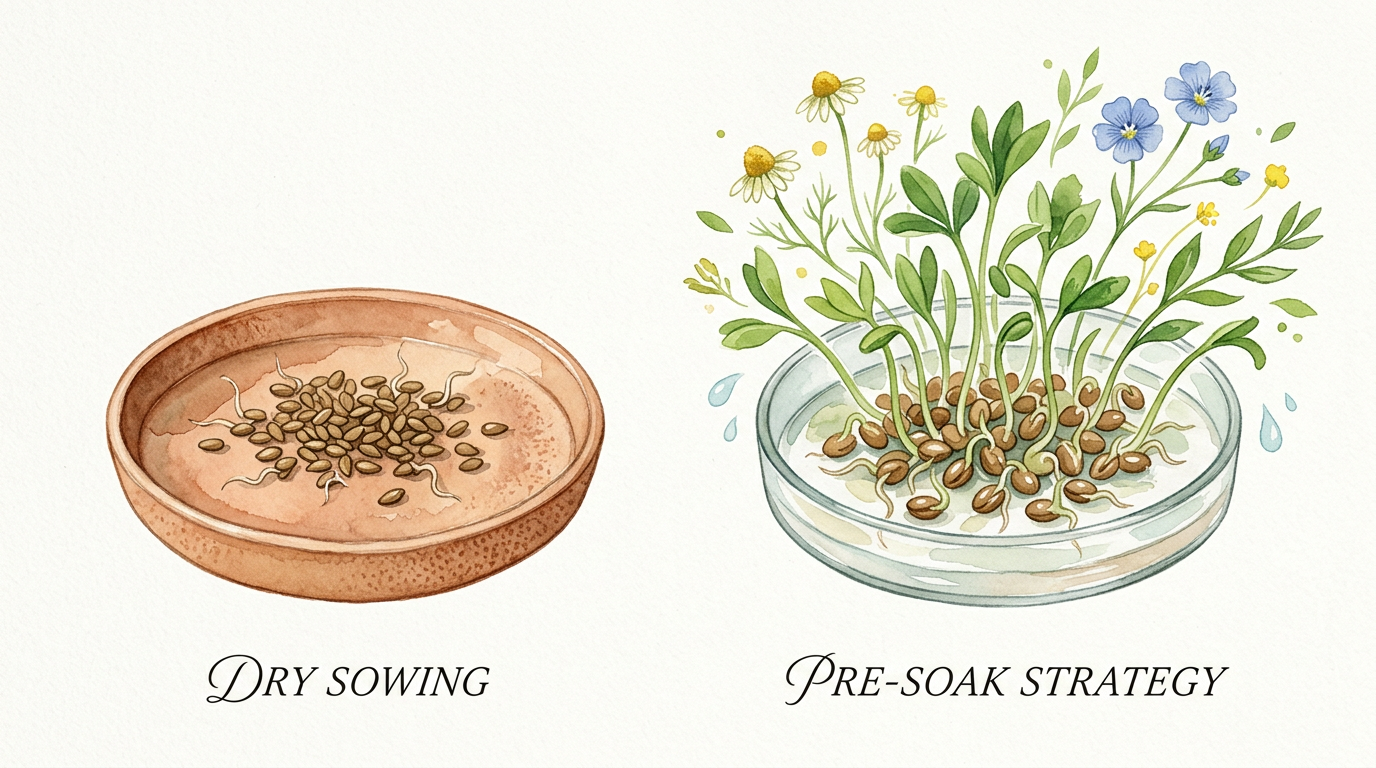
Why are you waiting weeks for sprouts that could pop in 48 hours with this one simple shift? Most gardeners waste days waiting for seeds to break dormancy. By switching from manual dry sowing to a strategic pre-soak, you trigger the biological ‘go’ signal before the seed even hits the soil. It’s the difference between a 20% germination rate and a 98% explosion of growth.
Sitting here on the porch, looking out over the rows, I think back to how many seasons I spent just staring at bare dirt, wondering if the peas were ever coming up. It took me a good decade to realize that Mother Nature doesn’t always play by our calendar, but she left us a few backdoors to speed things along. We often treat seeds like they’re just little pebbles, but they’re actually living things in a deep, protective sleep.
Waking them up properly is an art form. It isn’t just about getting them wet; it’s about signaling to the tiny embryo inside that the world is finally safe for it to emerge. If you’ve ever felt the frustration of a patchy garden bed where only half the seeds bothered to show up, then you know exactly why we need a better way. This approach changes the game from a guessing game to a sure thing.
Fastest Seed Germination Method For Sprouts
Pre-soaking, often called “priming” in the fancy books, is the most effective way to cut your waiting time in half. At its heart, this method involves submerging seeds in water or a nutrient-rich solution to jumpstart the process of imbibition. This is the scientific term for the seed drinking up water until its internal pressure builds enough to crack the outer shell.
In a typical dry-sown garden, a seed has to work hard to pull moisture from the surrounding soil. If the dirt is a bit too dry or the weather is a bit too windy, that moisture gets wicked away before the seed can get a good gulp. This leads to a stalled start. Pre-soaking removes that struggle entirely by providing 100% moisture contact from the very first second.
You’ll find this practice used most often with larger, hard-coated seeds like peas, beans, corn, and okra. It’s also a lifesaver for those notoriously slow starters like parsley or parsnips. Think of it like pre-heating an oven; you aren’t changing the recipe, you’re just making sure everything is ready to go the moment the tray goes in. This isn’t just about speed, either; it’s about uniformity. When every seed starts at the same time, your garden grows at the same pace, making weeding and harvesting much easier down the road.
How to Prime Your Seeds for Success
The process is simple, but the details matter if you want to avoid “drowning” your future plants. You’ll want to start with clean, lukewarm water. Cold water straight from a deep well can shock the seeds, while water that’s too hot—above 45°C (113°F)—can actually cook the delicate embryo inside. I usually aim for “tepid,” or about 20°C to 25°C (68°F to 77°F).
First, find a shallow dish or a simple glass jar. Place your seeds inside and cover them with at least double their volume in water. They are going to swell up as they drink, so they need plenty of room and extra liquid to pull from. A pea seed, for example, can nearly double in size after a good night’s soak.
Timing is the most critical part of this technique. Most seeds thrive with a soak of 8 to 12 hours. I usually set mine on the kitchen counter right before I head to bed. By the time I’ve had my morning coffee, they are plump, wrinkled, and ready for the dirt. If you leave them in too long—past the 24-hour mark—the water can become stagnant. This depletes the oxygen levels and can lead to the seed essentially suffocating before it even sprouts.
Once the time is up, drain the water immediately. You should notice the seeds look “heavy” and perhaps a bit darker in color. At this point, they are highly vulnerable. They’ve committed to growing, so you must get them into the ground or a seed-starting mix while they are still moist. If you let a soaked seed dry out completely on the workbench, you’ve likely killed it. The biological clock has started, and there is no “pause” button.
The Biological Advantages of Pre-Hydration
When a seed sits in water, it isn’t just getting wet. It is activating a complex chain of enzymes that begin breaking down stored starches into sugars. These sugars are the fuel the tiny plant uses to push its first root, the radicle, out into the world. In the soil, this process can take days of intermittent moisture. In a jar of water, it happens in hours.
Another major benefit is the removal of germination inhibitors. Many seeds, especially those that come from fleshy fruits like peppers or tomatoes, have a chemical coating designed to keep them from sprouting while they are still inside the fruit. In nature, winter rains wash these chemicals away. A quick soak mimics a whole season of rain, scrubbing those inhibitors off and telling the seed that the “coast is clear.”
This method also helps you identify which seeds are likely duds. While it isn’t a perfect rule, seeds that float after several hours of soaking often have air pockets inside or haven’t developed a full embryo. I usually give them a gentle poke; if they still won’t sink, I don’t count on them for my main rows. It saves you the space and the heartache of waiting on a plant that was never going to show up.
Challenges and Common Mistakes to Avoid
The most frequent error I see is the “soak and forget” trap. It’s easy to get distracted by a busy Saturday and leave those seeds in the jar for two days. When this happens, the water often turns cloudy or starts to smell a bit sour. This is a sign of fermentation and oxygen depletion. Without oxygen, the seed cannot “breathe” during its high-energy wake-up phase, and it will rot in the ground.
Another pitfall is soaking “mucilaginous” seeds. These are seeds like basil, chia, or flax that develop a sticky, gel-like coating when they touch water. If you try to soak these in a jar, you’ll end up with a clump of snotty-looking seeds that are impossible to spread out evenly. For these varieties, it is better to sow them dry and keep the soil surface consistently misty.
Temperature swings also cause trouble. If you leave your soaking seeds in a drafty window over a cold spring night, the water temperature might drop significantly. Cold water slows down the enzyme activity we are trying to speed up. Keeping the jar in a warm spot, perhaps on top of the refrigerator or near a gentle heat source, ensures the metabolic process stays in high gear.
When to Skip the Soak
Not every seed needs this kind of help, and some will actually be harmed by it. Very small seeds, like carrots, lettuce, or poppies, are a nightmare to handle once they are wet. They stick to your fingers, they stick to the trowel, and you’ll end up planting fifty in one spot and none in the next. For these tiny guys, I prefer to focus on soil preparation and using a light mulch to hold moisture at the surface.
Legumes like beans can sometimes be finicky, too. While many gardeners swear by soaking them, certain varieties are prone to “imbibitional shock.” This happens when the seed takes in water so fast that the internal tissues tear. If you notice your bean seeds splitting their skins or falling apart in the water, you’ve soaked them too long or the water was too cold. For beans, a shorter soak of 2 to 4 hours is often plenty.
Soaking Strategies by Seed Type
Different plants have different needs based on the thickness of their “armor.” Here is a breakdown of how I handle the regulars in my garden:
DIY PROJECT: Collect rainwater no matter where you live...

This DIY project is the best way to legally collect rainwater NO MATTER where you live. Get chlorine-free water, cut down on your water bills, and have enough for an emergency situation or to water your garden. Read More Here...
| Seed Category | Examples | Ideal Soak Time | Pro Tip |
|---|---|---|---|
| Large/Hard Coated | Peas, Corn, Okra, Squash | 8–12 Hours | Use lukewarm water; these are the best candidates. |
| Medium/Wrinkled | Beets, Chard, Parsnips | 6–10 Hours | Soaking helps wash away salt-based inhibitors. |
| Solanaceous | Peppers, Eggplants | 4–8 Hours | Warmth is more important than duration here. |
| Legumes (Fragile) | Snap Beans, Lima Beans | 2–4 Hours | Watch for skin splitting; don’t over-soak. |
Advanced Techniques for Stubborn Seeds
If you really want to step up your game, there are a few “old timer” tricks that go beyond plain water. One of my favorites is the Hydrogen Peroxide Soak. Mixing one part 3% hydrogen peroxide with thirty parts water can do wonders. The extra oxygen molecule helps break down the seed coat and also kills off any lingering fungal spores that might cause “damping off” later. A quick 20-minute dip in this solution before moving to a plain water soak is a great insurance policy.
Another trick is the Chamomile Tea Method. This is especially good for peppers and other tropical plants. Weakly brewed chamomile tea is mildly acidic and contains natural anti-fungal properties. It mimics the environment of an animal’s digestive tract, which is exactly where many of these seeds evolved to start their lives. It softens the shell and keeps the seed “clean” while it prepares to sprout.
For the toughest nuts to crack—like Lupines or Morning Glories—you might need to combine soaking with scarification. This involves gently nicking the seed coat with a file or rubbing it against a piece of sandpaper before it goes into the water. You only want to scratch the surface, not damage the “eye” of the seed. Once the shell is scuffed, the water can penetrate much faster, and you’ll see sprouts in record time.
Practical Tips for the Backyard Gardener
Always use a clean container. I’ve seen folks use old yogurt cups that weren’t washed properly, only to find their seeds covered in mold the next morning. A glass mason jar is your best friend here because it’s easy to sanitize and you can see exactly what’s happening inside.
If you are planting a lot of different varieties at once, labeling is non-negotiable. Wet seeds all look remarkably similar. I like to use a piece of painter’s tape on the jar with the variety and the time I started the soak. There is nothing more frustrating than having ten jars of “mystery peas” and not knowing which is which.
When it comes time to plant, have your garden beds or trays ready before you drain the seeds. The transition from the soak to the soil should be as quick as possible. I usually carry the jar out to the garden, drain it through my fingers at the head of the row, and drop the seeds into the furrows immediately. If the soil is particularly dry, water the furrow first, drop the seed, and then cover it with dry soil. This creates a “moisture sandwich” that keeps the seed from drying out.
Real-World Scenario: The Great Pea Race
Two springs ago, I decided to run a little experiment. I planted two rows of “Sugar Ann” snap peas side-by-side. The first row was dry-sown, straight from the packet into the damp April soil. The second row was soaked in lukewarm water for exactly 10 hours before planting.
The results were stark. The soaked row had green shoots poking through the dirt in just 4 days. The dry-sown row didn’t show any life for nearly 11 days. By the time the dry-sown peas were a few inches tall, the soaked peas were already starting to grab onto the trellis. Because the soaked row germinated so uniformly, I didn’t have to go back and replant gaps, which meant less work for me and a much heavier harvest in June.
This works just as well for late-summer plantings. If you’re trying to get a crop of bush beans in for the fall, the soil is often hot and dry. A pre-soaked seed has the internal moisture it needs to establish a deep root before the sun can bake it. It gives the plant a fighting chance during those first critical 48 hours.
Final Thoughts
Mastering the art of the pre-soak is one of those small shifts that changes how you look at the entire growing season. It moves you away from being a passive observer and turns you into an active participant in the plant’s life cycle. You aren’t just putting a seed in the ground and hoping for the best; you are providing the exact biological triggers required for life to begin.
Start small if you’re nervous. Try it with your next batch of peas or some large sunflower seeds. Once you see those first sprouts appearing days ahead of schedule, you’ll never go back to dry sowing those varieties again. It’s about working with the seed’s natural design rather than against it.
Remember that every garden is a bit different. Your water, your local temperature, and your specific soil will all play a part. Don’t be afraid to experiment with soak times or different additives like tea or peroxide. Gardening is a lifelong conversation with the earth, and this is just one more way to make sure you’re listening—and speaking—the right language.